
Can I redo my kitchen cabinets myself? Yes, you absolutely can redo your kitchen cabinets yourself! Kitchen cabinet refinishing is a fantastic way to give your kitchen a fresh look without the huge cost of buying new ones. This detailed guide will walk you through the steps for a great kitchen cabinet makeover ideas. We will cover everything from prep work to the final coat.
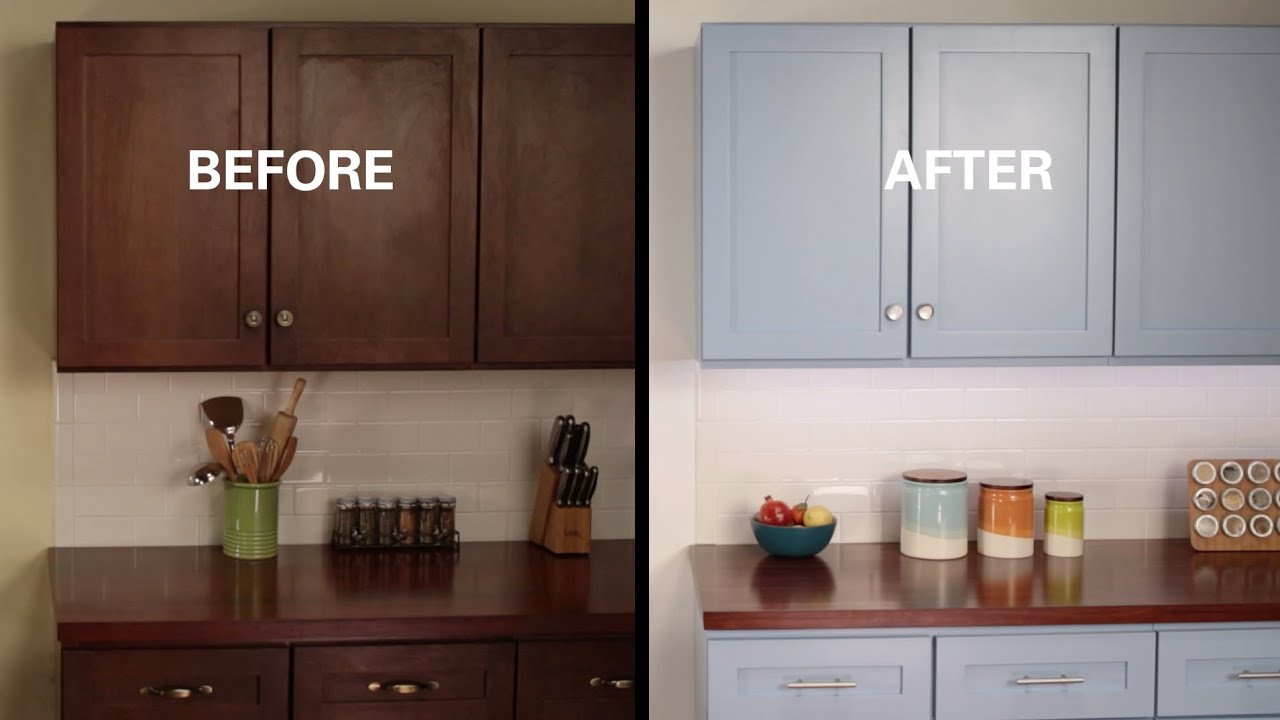
Image Source: i.ytimg.com
Why Update Your Kitchen Cabinets?
Old cabinets can make a whole kitchen look dated. Refinishing old kitchen cabinets saves money. It also helps the environment by avoiding landfill waste. Whether you are looking for the best way to update kitchen cabinets or just a simple refresh, this DIY route is rewarding. Many homeowners wonder if they should paint or stain. We will touch upon both paths, though painting is often the choice for a dramatic change.
Planning Your Cabinet Refresh Project
Good planning saves time and headaches later. Think about the final look you want. Do you want a crisp white, a deep navy, or perhaps a natural wood look achieved through stripping and staining cabinets?
Assessing Cabinet Condition
First, check your cabinets closely. Are they solid wood? Are they laminate or thermofoil? This matters a lot for preparation.
- Solid Wood: Great for painting or staining. They hold up well to sanding and prep.
- Veneer: Needs careful sanding. Too much pressure can go through the thin veneer layer.
- Laminate/Thermofoil: These surfaces are slick. They need special primers and often require light sanding to help the new finish stick.
Choosing Your Finish Method
The two main paths are painting or staining.
- Painting: Offers the biggest visual change. It covers imperfections well. This is the focus for most cabinet painting tutorial guides.
- Staining/Refinishing: Best if you love the wood grain but want a new color or tone. This is often part of the cabinet restoration process for antique pieces.
Gathering Your Tools and Supplies
You need the right gear before you start. Think of this as getting ready for serious DIY cabinet resurfacing.
| Tool/Supply Category | Essential Items | Notes |
|---|---|---|
| Preparation | Screwdriver set, box labels, painter’s tape, drop cloths | Label every door and drawer explicitly. |
| Cleaning | Degreaser (TSP or strong detergent), scrub pads, rags | Getting the grease off is vital for paint adhesion. |
| Sanding | Orbital sander, sanding sponges (120 and 220 grit), tack cloth | Do not skip sanding! It helps the primer stick. |
| Finishing | High-quality primer (stain-blocking if needed), cabinet paint (Urethane or Alkyd), brushes, foam rollers | Use paint made for cabinets, not wall paint. |
| Optional | Paint sprayer, mineral spirits (if using oil-based paint) | Spraying gives the smoothest finish. |
Step 1: Detailed Preparation is Key
This stage takes the most time, but it is the most important part of kitchen cabinet refinishing. If prep is bad, the paint will fail, no matter how good the paint is.
Removing Doors and Hardware
Take everything off the cabinets.
- Remove all doors and drawers. Lay them on a clean, protected surface, like sawhorses covered with drop cloths.
- Place small pieces of tape on the back of each door where the hinges were. Write down which cabinet box the door belongs to (e.g., “Upper Left Door 1”).
- Remove all knobs and pulls. Keep the screws together with the hardware pieces.
Deep Cleaning the Surfaces
Kitchen cabinets have built-up grease and grime. This dirt stops paint from sticking.
- Use a strong degreaser like TSP substitute, or a strong mix of dish soap and water.
- Scrub every surface—fronts, backs, and edges. Rinse well with clean water and let dry completely. The surfaces must be perfectly dry before moving on.
Sanding for Adhesion
Sanding creates a “key” for the primer to grab onto. If you are stripping and staining cabinets, you will sand much more aggressively. For painting, you are just dulling the surface.
- Use 120-grit sandpaper or a sanding sponge on wood and laminate. You do not need to remove all the old finish, just scuff it up well.
- If you have flat cabinet panels, use an orbital sander for speed. Be gentle on edges so you don’t create valleys.
- Wipe down every surface again with a tack cloth. This removes all the sanding dust. This step is crucial for a smooth job.
Step 2: Priming for Longevity
Primer seals the surface, blocks tannins (especially in wood like oak or cherry), and provides a good base for the topcoat. For the best way to update kitchen cabinets, do not skip primer.
Selecting the Right Primer
- For Wood Cabinets: Use a stain-blocking primer if you see any dark spots or tannins bleeding through. Oil-based or shellac-based primers are excellent for this, though they require mineral spirits for cleanup.
- For Laminate/Thermofoil: Use a specialized bonding primer designed to stick to slick surfaces. Some products specifically state they work on laminate without heavy sanding.
Applying the Primer
Apply a thin, even coat. Thick coats dry slow and can drip.
- Brush or roll the primer onto the cabinet boxes first.
- Do the doors and drawer fronts next. Work with the grain if you are working on wood.
- Let the primer dry fully according to the can’s directions. Sometimes a second light coat of primer is needed, especially over repairs or very dark finishes.
Step 3: Choosing Your Color and Paint Technique
Now we move into the exciting part of cabinet painting tutorial—the color!
Paint Selection
The quality of your paint determines the durability of your finish. Cheap paint will chip easily.
- Oil-Based (Alkyd): Very hard, durable finish. Can yellow slightly over time, especially white shades. Harder to clean up (needs mineral spirits).
- Water-Based Acrylic/Urethane Blends: Modern cabinet paints (like specific cabinet enamel lines) offer the durability of oil but clean up easily with water. They are highly recommended for most DIYers.
Application Methods Compared
This is where you decide between brushing/rolling or spraying.
| Method | Pros | Cons | Best For |
|---|---|---|---|
| Brushing/Rolling | Low equipment cost, easier cleanup, good control. | Brush strokes may show, takes longer. | Beginners, small touch-ups. |
| Spraying (HVLP Sprayer) | Smoothest, factory-like finish, fastest coverage. | High initial cost, requires a dedicated, well-ventilated space, steep learning curve. | Achieving professional cabinet refinishing look. |
If you choose spraying, set up a spray booth in your garage or outside using plastic sheeting walls. Ventilation is critical for safety and to keep dust off the wet paint.
Step 4: Painting the Cabinets
Work in stages. Finish all the boxes, then move to the doors.
Painting the Cabinet Boxes
Start with the inside surfaces first, then the frames (face frames).
- Apply a thin, even coat of paint. Follow the manufacturer’s instructions for recoat times.
- Use a high-quality angled brush for corners and a small foam roller for flat surfaces. The foam roller helps reduce texture.
- If you see drips, gently smooth them out with a wet brush tip before the paint sets up too much.
Painting the Doors and Drawer Fronts
Doors are your most visible pieces. They need the most attention.
- If using a brush and roller, paint the recessed areas first, then roll the flat center panel, and finish with the edges.
- If spraying, lay the door flat on sawhorses. Spray light, even coats, moving slowly. Spray from the top down, then switch to spraying from the side to cover all edges evenly.
Wait for the first coat to dry completely before applying the second. Most jobs require two coats of paint for full color saturation and durability.
Step 5: Curing and Reassembly
This is often rushed, leading to premature damage. Paint needs time to “cure,” not just dry. Curing is when the paint hardens fully.
Curing Time
Check your specific paint can. Most enamel paints need 24-48 hours before handling carefully. However, they may need 5 to 7 days to reach full hardness where they can handle bumps and closing doors firmly. Do not reassemble cabinets too soon!
Finishing Touches and Hardware
- Lightly scuff-sand (using 320 or 400 grit sandpaper) between topcoats only if directed by the paint manufacturer, and always wipe off dust with a tack cloth.
- Once the paint is fully cured (wait at least three days if possible), reinstall the hardware.
- Screw the doors and drawers back onto the boxes. Adjust hinges so everything lines up perfectly. New hinges can improve door alignment significantly.
Alternative: The Stripping and Staining Cabinets Process
If you prefer the look of wood, the cabinet restoration process involves removing the old finish first. This is ideal for refinishing old kitchen cabinets where the underlying wood is beautiful.
Stripping the Finish
- Chemical Stripper: Apply a chemical stripper liberally to the door and frame surfaces. Let it sit until the old finish bubbles up.
- Scraping: Use a plastic scraper or putty knife to gently lift the dissolved finish. Use fine steel wool (0000 grade) dipped in stripper for detailed areas.
- Neutralizing: Wash the stripped wood with a neutralizing agent (often mineral spirits or water, depending on the stripper used). Let it dry completely.
Sanding for Stain Prep
Sanding after stripping must be meticulous. Any remaining finish will show up as dark blotches when you stain.
- Start with 100 or 120 grit to smooth the surface after stripping.
- Finish sanding with 180 or 220 grit paper. For an ultra-smooth finish, go up to 320 grit.
- Always sand with the grain.
Applying Stain
- Pre-Stain Conditioner (Crucial for Soft Woods): Woods like pine or maple absorb stain unevenly. Apply a pre-stain conditioner first to ensure an even color. Skip this step only if you are staining very dense woods like oak.
- Staining: Apply the stain evenly with a brush or rag, wiping off excess after a few minutes. The longer you leave it, the darker the color.
- Sealing: Once the stain is dry, you must seal it with a clear coat (polyurethane or lacquer). This protects the stain and provides the final durability. Use at least two or three coats of sealer.
Comparing DIY vs. Professional Cabinet Refinishing
While DIY is rewarding, sometimes professional cabinet refinishing is the better route. Professionals often have specialized equipment, like high-end spray booths, which results in a flawless, durable finish that is hard for a novice to match.
When should you hire a pro?
- If you have a very large kitchen with many cabinets.
- If your cabinets are tricky, like ornate antique pieces or high-gloss thermofoil.
- If you lack the time or space for proper prep and curing.
For most standard wood cabinets, however, careful DIY kitchen cabinet refinishing can yield results very close to professional work.
Troubleshooting Common DIY Cabinet Issues
Even with detailed guides, problems arise. Here are common fixes related to how to paint wood cabinets.
Problem 1: Paint is Too Thick or Running
- Cause: Applying paint too thickly or not allowing enough drying time between coats.
- Fix: If wet, try to gently feather out runs with a damp brush. If dry, sand the runs smooth with 220-grit paper and apply a very thin second coat.
Problem 2: Brush Strokes Show on Doors
- Cause: Using the wrong type of brush or rolling too slowly, allowing the paint to set before smoothing out.
- Fix: If using oil or high-quality enamel, a light sanding (400 grit) between coats helps knock down texture. For the final coat, consider switching to a high-density foam roller or investing in a sprayer.
Problem 3: Paint is Peeling or Flaking Off
- Cause: Poor surface preparation. Grease, dust, or a slick surface prevented adhesion.
- Fix: You must strip the affected area back to bare wood or the previous finish. Clean, re-prime thoroughly, and repaint that section. Do not paint over failing paint.
Problem 4: Wood Grain Shows Through Paint (Bleed-through)
- Cause: Tannins or natural oils from the wood (especially oak, knotty pine, or cherry) bleeding through a standard primer.
- Fix: This requires spot-treating or re-priming the entire surface with a powerful stain-blocking primer (shellac-based is best). This is a common hurdle in refinishing old kitchen cabinets.
Making Modern Design Choices for Cabinets
The look you choose dramatically impacts the final feel of your kitchen. Here are some popular kitchen cabinet makeover ideas:
- Two-Tone Cabinets: Paint the lower cabinets one color (e.g., dark gray or blue) and the upper cabinets a contrasting light color (e.g., white or cream). This brightens the room while grounding the lower half.
- Open Shelving: Replace a few upper cabinet boxes with simple wood shelves for displaying dishes or décor. This makes the kitchen feel larger.
- New Hardware: Even if you don’t paint, swapping out old knobs for modern pulls (matte black, brushed gold, or simple leather pulls) instantly updates the look.
- Shaker Style Doors: If your current doors are flat panel, consider adding thin strips of wood trim to the center panels to give them a modern Shaker look before painting.
Safety First: Protecting Yourself During DIY Cabinet Resurfacing
Working with paint, strippers, and solvents requires safety precautions.
- Ventilation: Always work in a well-ventilated area, even when using low-VOC paints. Open all doors and windows. Use fans to draw air out of the work area.
- Respirators: If sanding or spraying, wear a respirator rated for organic vapors and fine particulates. A simple dust mask is not enough.
- Skin and Eye Protection: Wear safety glasses and chemical-resistant gloves, especially when handling strippers or oil-based products.
Final Thoughts on Your Cabinet Project
DIY cabinet resurfacing is a big undertaking, but the results are worth the effort. By sticking to thorough preparation—cleaning, sanding, and priming—you set yourself up for success. Whether you choose a bright new paint color or opt for the more involved stripping and staining cabinets method, you are transforming the heart of your home affordably and effectively. Take your time, follow the curing times, and you will enjoy beautiful, updated cabinets for years to come.
Frequently Asked Questions (FAQ) About Redoing Kitchen Cabinets
Q: How long does it take to paint kitchen cabinets?
A: For a standard mid-sized kitchen (15–20 doors/drawer fronts), most DIYers spend about 3–5 full days on the project. This includes prep, two coats of primer, two coats of paint, and crucial drying/curing time between steps. Rushing the drying process is the biggest mistake.
Q: Can I paint over existing laminate cabinets without sanding?
A: While some specialized bonding primers claim to work without heavy sanding, it is highly risky. Laminate is extremely slick. For the best adhesion, you must at least scuff-sand the entire surface to create a profile for the primer to grab onto. Heavy sanding is usually avoided, but light scuffing is necessary.
Q: What is the most durable finish for kitchen cabinets?
A: The most durable finishes are typically two-part catalyzed lacquers or high-quality polyurethane enamel paints. These create a very hard shell that resists chipping and cleaning chemicals better than standard latex wall paint. Durability comes more from the type of paint than the application method, though spraying often achieves the most even layer.
Q: Should I remove the cabinet doors or paint them while attached?
A: Always remove the doors and drawers. Painting them while attached leads to uneven coverage, paint drips on the hinges and frames, and you cannot properly paint the inside edges or the back of the door itself.
Q: Is cabinet glazing worth the effort?
A: Glazing is an optional decorative technique used to add depth or an antique look, often applied over a base color. It adds complexity to the cabinet restoration process. If you like a rustic or traditional look, glazing can be a beautiful addition, but it requires extra coats and careful blending/wiping techniques.