
Refacing kitchen cabinets means you update their look without ripping out the entire boxes. This is a great way to save money and time compared to full replacement. You keep the existing cabinet frames. You only replace or cover the doors, drawer fronts, and visible side panels.
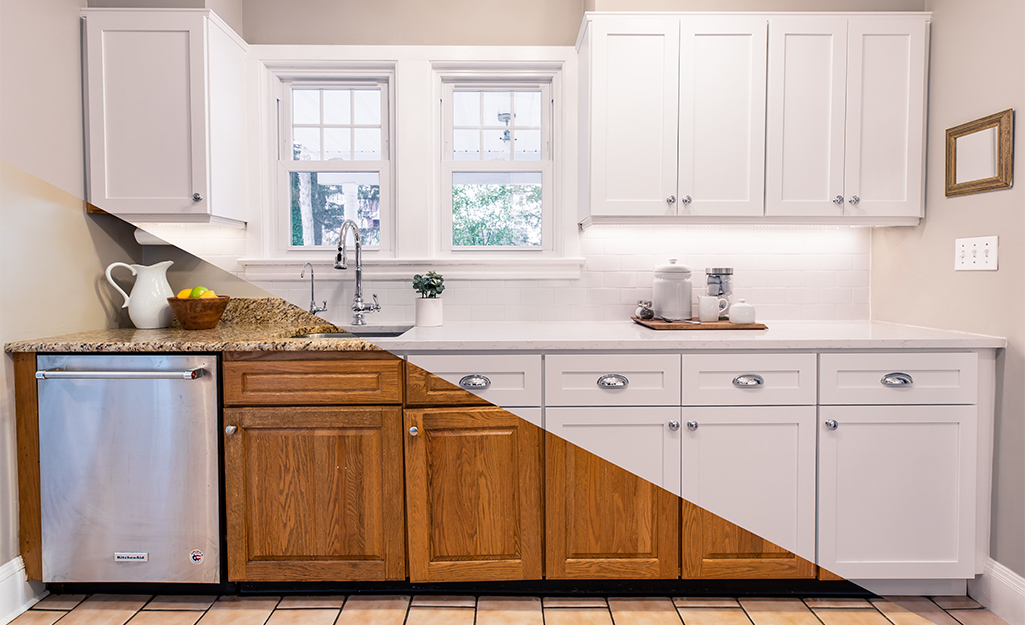
Image Source: contentgrid.homedepot-static.com
Why Choose Cabinet Refacing Over Replacement?
Many homeowners wonder about cabinet door replacement versus refacing. Refacing is generally quicker and costs less than tearing out old cabinets and installing new ones. If your cabinet boxes are still sturdy and in good shape, refacing is a smart choice. Full replacement involves demolition, potentially plumbing or electrical adjustments, and a longer overall project time. Refacing keeps disruption to a minimum.
Cabinet resurfacing options offer flexibility. You can dramatically change the style of your kitchen with just a few changes. This guide will walk you through the entire process of a successful DIY project.
Deciphering the Refacing Process: Preparation is Key
Before you start any work, you need a solid plan. Good preparation prevents mistakes later on. This is where many DIY projects go wrong.
Assessing Your Current Cabinets
First, look closely at what you have. Are the cabinet boxes made of solid wood, plywood, or particleboard? This affects how you prep the surface. Solid wood is very durable. Plywood holds paint and veneer well. Particleboard needs special care, often requiring a high-quality bonding primer.
Gathering Tools and Materials
Having the right supplies makes the job smooth. If you plan to do this yourself, you need more than just paint. Think about the best cabinet refacing kits available in stores.
Essential Tools Checklist:
- Screwdrivers (manual and electric)
- Measuring tape and level
- Painter’s tape and plastic sheeting (for protection)
- Sander (orbital sander works best) and various sandpaper grits (80, 120, 220)
- Cleaning supplies (degreaser, mild soap)
- Brushes and rollers (high-quality foam rollers are great for smooth finishes)
- Wood filler or epoxy for repairs
- Adhesive or bonding primer, depending on your chosen finish
Choosing Cabinet Refacing Materials
This is the most exciting part! Your choice of material dictates the final look and feel. When considering kitchen cabinet refacing ideas, think about durability and maintenance.
Material Options for Refacing:
| Material Type | Pros | Cons | Best For |
|---|---|---|---|
| Wood Veneer | Looks like real wood, high-end finish. | Can be costly, requires careful application. | Traditional or upscale looks. |
| Laminate | Very durable, easy to clean, many patterns. | Can look less premium than real wood. | High-traffic kitchens. |
| Thermofoil (Vinyl) | Affordable, seamless finish, wide color range. | Can peel or yellow with extreme heat. | Modern, budget-conscious updates. |
| Paint | Total color control, relatively low cost to reface kitchen cabinets. | Labor-intensive prep work, chips if not done well. | Painting over existing wood or laminate. |
If you choose the laminate cabinet refacing process, know that it involves precise cutting and strong contact cement application. If you select paint, look into resources on how to paint kitchen cabinets professionally for the best results.
Step 1: Removing Doors and Hardware
This is the first physical step in your DIY cabinet refacing guide. Do this methodically.
- Label Everything: Use sticky notes or masking tape to label every door and drawer front. Mark where it came from (e.g., “Upper Left,” “Bottom Center”). This saves huge headaches later.
- Remove Hardware: Take off all knobs and pulls. Keep the screws in a marked plastic baggie for each door set.
- Remove Doors and Drawer Fronts: Carefully unscrew the hinges from the cabinet frame. If the hinges are old or damaged, you might replace them now. Lay the doors on a soft, protected surface, like blankets or cardboard.
Tip: If you are only replacing doors and not hardware, measure the existing hole patterns now. New hardware might require drilling new holes.
Step 2: Cleaning and Preparing the Surfaces
Proper surface prep ensures your new finish sticks well. Poor prep leads to peeling, bubbling, or an uneven finish.
Cleaning Deeply
Grease and grime are the enemies of adhesion. Use a strong degreaser. A mixture of TSP (Trisodium Phosphate substitute) and water works well. Wipe down all surfaces: the cabinet faces (boxes), the drawer fronts, and the inside of the doors you are keeping. Rinse well with clean water. Let everything dry completely.
Repairing and Sanding
Examine the cabinet frames and any doors you plan to keep.
- Fill Imperfections: Use wood filler for small dents or scratches on wood frames. For deeper holes, epoxy fillers offer a harder repair. Let fillers dry fully.
- Sanding the Frames: You must “scuff” glossy or slick surfaces. This gives the primer something to grip onto. Use 120-grit sandpaper first to remove any loose finish or heavy gloss. Follow up with 220-grit sandpaper for a smooth feel. Don’t sand down to bare wood unless necessary; just dull the shine.
- Sanding Doors/Drawer Fronts (If Repainting): If you are keeping old doors and painting them, sand them just as thoroughly as the frames.
Step 3: Applying the Finish to Cabinet Boxes
The boxes get the first treatment because they usually stay in place. This is critical for a professional look.
Priming the Boxes
Primer acts as a bridge between the old surface and the new paint or veneer adhesive.
- For Wood/Plywood: Use a high-quality bonding primer.
- For Laminate/Melamine: Use a specialized primer designed for slick, non-porous surfaces. This step is vital for successful painting.
Apply the primer thinly and evenly. Let it cure fully according to the manufacturer’s instructions. You might need two light coats. Lightly sand with 220-grit sandpaper between coats if the primer raises the grain.
Painting or Wrapping the Boxes
If you are painting, this is where you achieve professional results. Follow tips for how to paint kitchen cabinets professionally: use thin coats, maintain a consistent pace, and avoid over-brushing. Spraying offers the smoothest finish, but rolling with a high-density foam roller works well for DIYers.
If you are using veneer or laminate for the boxes, apply the adhesive now and carefully place the new skin onto the frames. Work slowly, smoothing out bubbles as you go.
Step 4: Dealing with Doors and Drawer Fronts
This step determines the biggest visual impact. You have options: replacing the door entirely or refinishing the existing ones.
Option A: Full Cabinet Door Replacement
If you opt for brand-new doors (a popular choice among kitchen cabinet refacing ideas), you will measure the frame opening and order doors that fit.
- Measure Accurately: Measure the height and width of the opening (the space where the door sits). Note the overlay style (full overlay, partial overlay).
- Order Doors: Order doors in your chosen material (wood, MDF, etc.) to match your style.
- Install New Doors: Attach the new doors using new hinges designed for your overlay style.
Option B: Refinishing Existing Doors
If you keep your doors, they need the same prep as the boxes: clean, repair, and sand.
- Painting Doors: Lay doors flat on sawhorses or covered tables. Paint them horizontally. It is often easier to paint doors separately than to try and paint them while attached to the boxes.
- Laminate Cabinet Refacing Process: If you are using laminate or contact paper to cover doors, this requires precision.
- Cut the laminate slightly larger than the door panel.
- Apply contact cement to the back of the laminate and the door surface, or use the self-adhesive backing.
- Start application from one edge, carefully peeling the backing away slowly.
- Use a plastic smoothing tool or credit card to push air bubbles out immediately.
- Once fully adhered, trim the excess laminate using a sharp utility knife along the edges.
Option C: Vinyl Wrap Kitchen Cabinets
Vinyl wrap kitchen cabinets is a popular, affordable resurfacing choice. Quality vinyl wraps are durable and mimic the look of painted or slab doors.
- Clean and sand the doors lightly.
- Measure precisely.
- Use a heat gun (on a low setting) to help the vinyl stretch around edges and corners. This makes the vinyl pliable and helps create a smooth, sealed finish.
Step 5: Reassembly and Final Touches
Once all surfaces are finished, cured, and completely dry, it is time to put the kitchen back together.
Installing Doors and Drawers
- Attach Hardware: Screw the knobs and pulls back onto the new or refinished doors and drawer fronts.
- Hang Doors: Reattach the doors to the cabinet frames using the hinges. Ensure they hang straight. Most modern hinges have adjustment screws that let you move the door up/down, left/right, and in/out slightly until the gaps (reveals) between doors are perfectly even. This small adjustment is key to a professional outcome.
- Insert Drawer Fronts: If you removed the drawer boxes completely, slide them back in. If you only replaced the drawer fronts, attach them to the existing drawer boxes.
Addressing Side Panels
Don’t forget the visible sides of the cabinets that face the room. These need finishing too. You can paint them to match the doors, apply matching veneer, or install thin panels of matching wood/laminate for a custom built-in look.
Comparing Refacing Costs and Value
The cost to reface kitchen cabinets varies widely based on material choices. Generally, refacing is 40% to 60% less than full replacement.
| Project Type | Estimated Cost Range (Mid-Size Kitchen) | Main Cost Driver |
|---|---|---|
| Painting Existing Cabinets | \$1,500 – \$4,000 (DIY or Pro) | Labor/Paint Quality |
| Door Replacement Only | \$2,500 – \$6,000 | Door Style and Wood Type |
| Full Refacing (Veneer/Laminate) | \$4,000 – \$8,000 | Material Cost and Complexity |
| Full Cabinet Replacement | \$10,000 – \$25,000+ | Cabinet Quality and Installation |
Refacing offers excellent return on investment (ROI) because it significantly updates the kitchen’s appearance without the heavy expense of new boxes.
Finalizing Your Kitchen Look: Style Considerations
When planning your project, review the best kitchen cabinet refacing ideas for modern appeal.
- Shaker Style: Always popular. If your existing doors are flat, replacing them with Shaker style adds instant architectural detail.
- Slab Doors: Flat, handle-less doors provide a sleek, contemporary look, perfect when using vinyl wrap or smooth painted finishes.
- Color Choice: Gray, white, and navy remain top choices for longevity in style. Dark colors absorb light, while light colors make the space feel bigger.
Frequently Asked Questions (FAQ)
Q: How long does it take to reface kitchen cabinets?
A: A typical DIY cabinet refacing guide suggests a project timeline of one to two weeks. The actual hands-on time is usually 3 to 5 full days. The longest waits are for materials to arrive and for paint or adhesive to fully cure (dry).
Q: Can I reface cabinets that already have laminate on them?
A: Yes, you can. However, you must use specialized primers designed to bond to slick surfaces like laminate or melamine. Skipping this primer step is the quickest way to have your new finish fail. Thorough cleaning is also essential.
Q: Is cabinet refacing cheaper than painting?
A: Generally, painting cabinets yourself is the cheapest route, provided your existing cabinets are in good shape. However, if you hire professionals for painting, the cost to reface kitchen cabinets using durable materials like laminate might end up being similar to professional painting costs, but the laminate may offer better long-term durability against wear and tear.
Q: What is the difference between refacing and refinishing?
A: Refinishing usually means sanding and repainting or restaining the existing doors and boxes. Refacing involves installing new skins (veneer, laminate) over the boxes and replacing the doors and drawer fronts entirely. Refacing offers a more dramatic style change than simple refinishing.
Q: Can I use vinyl wrap on heavily damaged doors?
A: Vinyl wrap works best on relatively smooth surfaces. If doors have deep gouges or missing veneer pieces, those areas must be filled and sanded flat first. If the damage is too severe, cabinet door replacement versus refacing might lean toward replacement, as the wrap will simply follow the contours of the damage underneath.