
What is the best height for cabinet knobs? Generally, cabinet knobs should be placed about 2 to 3 inches down from the top edge of the door, centered horizontally. For cabinet handles, they are usually centered vertically on the stile (the vertical frame piece) or positioned about 2 to 3 inches up from the bottom edge of the door, depending on the style and drawer height.
Getting cabinet hardware placement right is vital. It affects how your kitchen looks and how easy it is to use every day. Placing hardware correctly is more than just guesswork; it involves measuring, aligning, and matching the hardware style to the cabinet design. This guide will help you map out the optimal placement for cabinet hardware, ensuring a beautiful and functional kitchen.
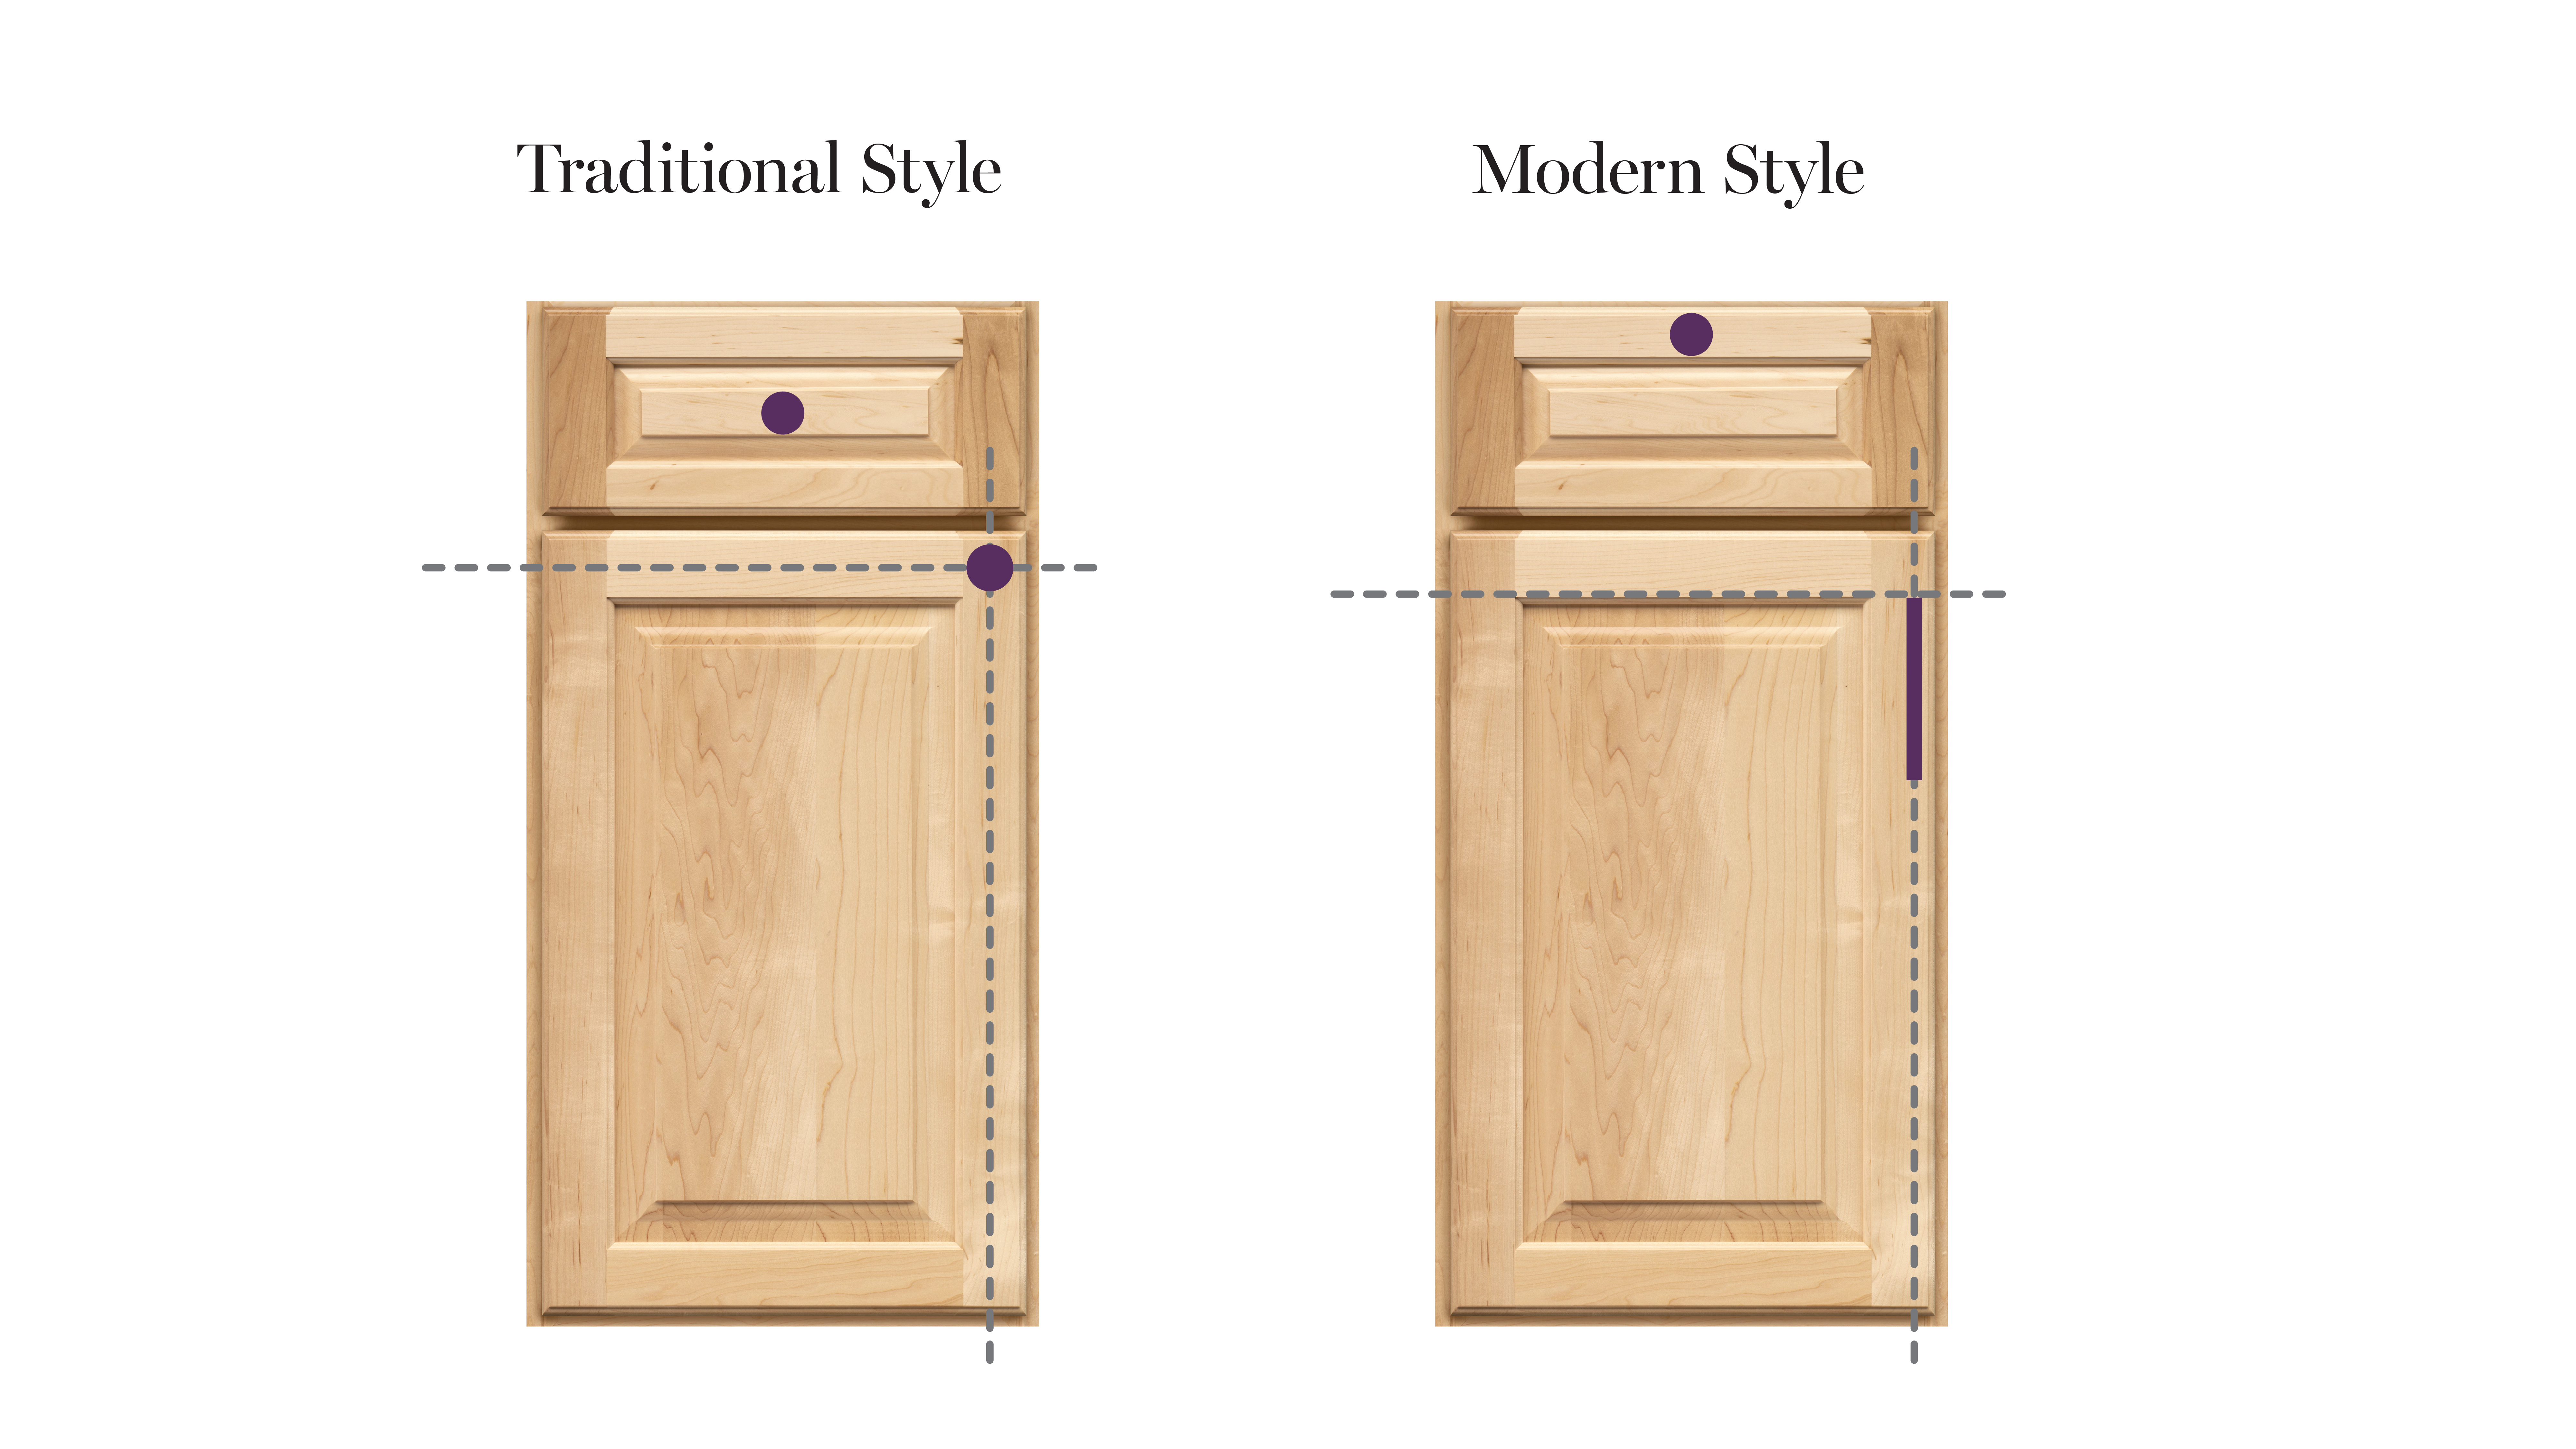
Image Source: www.kraftmaid.com
Deciphering Cabinet Hardware Types and Their Needs
Before drilling any holes, you must know what hardware you are installing. Knobs and handles work differently, and their placement needs adjust accordingly.
Knobs vs. Pulls (Handles)
Knobs are single-point anchors, usually round or square. Pulls, or handles, require two anchor points, offering a more secure grip, especially on larger doors or drawers.
Knobs:
* Need just one drill point.
* Work best on smaller doors (under 30 inches tall).
* Offer a classic, simple look.
Pulls (Handles):
* Require two drill points.
* Provide better leverage for heavy doors or deep drawers.
* Often look more modern or transitional.
Centering and Spacing for Pulls
If you choose pulls, you must consider the center-to-center measurement. This is the distance between the two screw holes on the hardware itself. This measurement dictates where you will drill your second hole.
| Pull Size (Center-to-Center) | Typical Use Case |
|---|---|
| 3 inches | Small cabinet doors, utility drawers |
| 4 inches | Standard cabinet doors |
| 5 to 6 inches | Large pantry doors, deep drawers |
| 8 inches or more | Appliance panels, very wide drawers |
Accurate measuring for cabinet knobs and pulls starts with knowing this dimension.
Establishing the Standard for Cabinet Knob Positioning
The placement of knobs sets the visual rhythm for your entire kitchen. Consistency is key to a professional finish. We will look at doors first, as they present the most variations.
Best Height for Cabinet Knobs on Doors
For standard cabinet doors (both upper and lower), the goal is visual balance and ease of access. You want the hardware high enough to avoid bumping it with your hip but low enough to grab easily without reaching too high.
Recommended Placement:
- From the Top Edge: Measure down 2 to 3 inches from the very top edge of the door.
- Horizontal Center: Find the exact center point horizontally on the stile.
For doors over 42 inches tall, some designers prefer placing the knob slightly lower, around 3 inches from the top. However, sticking to the 2-to-3-inch rule keeps things uniform across the whole kitchen.
Kitchen Cabinet Door Handle Placement
Handles offer more flexibility but need strict rules for consistency.
For Standard Doors (Using Pulls):
When using a handle, you have two main options: placing it near the top or near the bottom.
- Top Placement: Mirror the knob placement. Measure 2 to 3 inches down from the top edge and center it horizontally. This works well if you have standard-height doors.
- Bottom Placement: Measure 2 to 3 inches up from the bottom edge and center it horizontally. This looks great on lower cabinets, as it keeps the hardware away from general countertop activity.
Crucial Alignment Point: If you mix knobs and pulls in the same room, always place them at the same vertical height on matching cabinet doors for a seamless look.
Optimal Placement for Cabinet Hardware on Drawers
Drawers follow simpler rules, as their height usually dictates the hardware placement.
Installing Cabinet Handles on Drawers
Drawers typically use handles (pulls) rather than knobs, especially wider ones.
Standard Drawer Rule: Center the hardware both vertically and horizontally.
- Horizontal Center: Find the midpoint across the width of the drawer face.
- Vertical Center: Find the midpoint from the top edge to the bottom edge of the drawer face.
This centered placement looks balanced and provides the best grip when pulling the drawer open.
Knob Placement on Drawers
If you opt for knobs on drawers, the standard placement is the same as for handles: perfectly centered on the drawer face.
Exception for Stacking Drawers: If you have a stack of three or more drawers that are very short (less than 6 inches high), placing the knob near the top edge (about 1 inch down) often looks cleaner than centering it on the tiny face.
Mastering the Layout Guide: Upper vs. Lower Cabinets
The layout guide shifts slightly when moving between wall cabinets and base cabinets.
Upper Cabinet Hardware Layout Guide
Upper cabinets are usually easier because they are mounted higher, away from eye level when standing.
- Knobs: Place 2 inches down from the top edge, centered horizontally.
- Handles: Place 2 to 3 inches down from the top edge, centered horizontally.
Consistency across all upper cabinets is essential. If one upper cabinet has a knob 2 inches down, they all must follow suit.
Lower Cabinet Hardware Layout Guide
Lower cabinets include both doors and drawers beneath the countertop.
- Lower Doors: You can choose 2 inches down from the top, or you can choose 2 inches up from the bottom. Many professionals prefer the bottom placement for lower doors because it is easier to grab when bending down slightly. Choose one and stick to it for all lower doors.
- Lower Drawers: Center the hardware vertically and horizontally.
Tip for Visual Flow: If you have an integrated dishwasher panel (which looks like a regular cabinet door), treat it like a door for hardware placement. Place the handle or knob at the same height as the surrounding lower cabinet doors.
The Technical Side: Measuring and Marking for Installation
Precise marking prevents crooked hardware and wasted material. This section focuses on the practical steps for accurate drilling points for cabinet knobs and pulls.
Essential Tools for Cabinet Hardware Placement
Before you begin, gather these tools:
- Measuring Tape: For precise distance checks.
- Pencil: For making light marks.
- Square or Ruler: To ensure straight horizontal and vertical lines.
- Cabinet Hardware Jig: This template is the secret weapon for perfect consistency, especially for pulls.
- Drill and Bits: Use the size specified by your hardware manufacturer.
Step-by-Step: Measuring for Cabinet Knobs and Pulls
This process must be systematic. Measure twice, mark once!
1. Marking for Knobs (Single Point)
- Determine Height: Decide on your vertical measurement (e.g., 2.5 inches from the top). Mark this lightly on the stile.
- Determine Width: Find the exact horizontal center of the stile. Draw a light vertical line here.
- Cross: Where the vertical and horizontal lines meet is your drill point.
2. Marking for Pulls (Two Points)
This requires using your specific pull’s center-to-center measurement.
- Determine Vertical Placement: Decide if the pull will be high (near the top) or low (near the bottom). Mark this line lightly.
- Find Horizontal Center: Mark the exact center of the cabinet face.
- Use the Jig or Measure Out:
- If using a Jig: Place the jig over your center mark and drill through the guide holes.
- If measuring manually: Take half of the pull’s center-to-center measurement (e.g., if the pull is 4 inches, use 2 inches). Mark the first drill point 2 inches toward the hinge side of the cabinet from the center mark. Mark the second drill point 2 inches toward the opening side of the cabinet from the center mark.
Ensure both marks lie perfectly on your predetermined vertical placement line.
Importance of the Cabinet Hardware Jig
A hardware jig is invaluable for handle installation on cabinets. It eliminates human error when repeating measurements across many doors and drawers. Most jigs have adjustable sliders to accommodate various pull lengths (3″, 4″, 5″, etc.) and standard knob placements.
Addressing Cabinet Edges and Stile Widths
Cabinet construction is not uniform. You must account for the frame around the door panel.
Placement on Framed Cabinets
Framed cabinets have a visible wooden border (the stile and rail) surrounding the door panel.
- Knobs/Pulls: Always place hardware on the stile, away from the recessed center panel.
- Stile Width Check: Ensure your pull does not hang over the edge of the stile or interfere with the face frame next to it when the door opens. For pulls, the screw holes must land firmly on the wood frame.
Placement on Full Overlay/Slab Doors
Slab doors have a flat face with no frame. This offers the most freedom but demands strict measurement adherence.
- Knobs: Center them exactly as described above.
- Pulls: Since there is no stile, you center the pull horizontally on the door face itself. This often means the pull is positioned further from the edge than it would be on a framed door.
For full overlay doors, the horizontal position must be measured from the edge of the door material, not an internal frame.
Advanced Considerations for Kitchen Cabinet Hardware Layout Guide
A well-planned layout considers aesthetics and function equally.
Mixing Knobs and Pulls in the Same Kitchen
It is common to use knobs on small doors and pulls on drawers. If you do this, the vertical height must match exactly where they would align if they were both pulls or both knobs.
The Alignment Rule: If a drawer pull centers at 4 inches high, and an adjacent cabinet door uses a knob, that knob should be placed so its center point is also 4 inches from the same reference edge (e.g., the bottom of the cabinet).
Hardware on Appliance Panels
Appliance panels (refrigerator, dishwasher) should blend in seamlessly.
- Refrigerator: Use a handle that matches the vertical orientation of the adjacent pantry door handles. If pantry handles are vertical, the fridge handle should be vertical.
- Dishwasher: Because dishwashers are typically shorter than standard doors, you often place the handle near the bottom edge, mirroring the placement on the lower cabinet doors next to it.
Decorative vs. Functional Placement
Sometimes, hardware placement is dictated by the door style itself.
- Mullion Doors (Glass Panels): If a door has thin wooden strips (mullions) dividing the glass, you must place the knob precisely in the center of the solid wood stile. Avoid placing hardware where it might obscure too much of the glass or cross a mullion line.
Drilling Procedures: Drill Points for Cabinet Knobs and Pulls
Once all marks are made, the drilling must be accurate to secure the hardware properly.
Preparing the Door/Drawer Front
- Protect the Surface: Place a piece of scrap wood behind the area you plan to drill. This prevents “blowout”—where the drill bit tears the wood surface as it exits.
- Tape the Area: Place a strip of painter’s tape over your pencil marks. This helps prevent the wood from splintering where the bit enters the surface.
Drilling Technique
The correct technique minimizes damage and ensures straight holes.
- Start Slow: Begin drilling slowly to let the bit bite into the tape and wood surface.
- Maintain Angle: Keep the drill perfectly perpendicular (90 degrees) to the cabinet face. Use a small square to check the angle often.
- For Pulls: Drill the first screw hole completely through (using the scrap wood backing). Check that the hole lines up perfectly with the back mounting plate of the pull. If it’s off, adjust the second mark before drilling it.
Final Check on the Back Side
When you break through the back of the door or drawer, check your drill exit. If you see splintering, you drilled too fast or did not use firm pressure on the front side.
If you need to adjust for a pull, re-check the center-to-center distance between the holes before inserting any screws.
Readability Enhancement Summary
To make this information accessible, we have focused on short sentences and common words. The guidelines prioritize easy application through simple steps:
- Knobs: 2-3 inches down from the top, centered side-to-side.
- Drawers: Centered both ways.
- Pulls: Use the center-to-center measurement carefully when marking the two required holes.
By following these clear steps, anyone can achieve professional-grade cabinet hardware installation.
Frequently Asked Questions (FAQ)
Q1: Should I use knobs or pulls on my kitchen cabinets?
This is a design choice, but function matters too. Knobs are simpler and cheaper, fitting traditional styles. Pulls (handles) are easier to grip and are often preferred for drawers and larger doors. Many kitchens successfully mix both styles.
Q2: Can I install hardware on a cabinet door that already has holes?
Yes, but you must check the hole spacing. If your new hardware has a different center-to-center measurement than the existing holes, you might have to patch the old holes and drill new ones. This requires patching wood filler and refinishing the area before proceeding with handle installation on cabinets.
Q3: What is the standard measurement for cabinet hardware?
There is no single standard, but 3-inch and 4-inch center-to-center pulls are the most common sizes found in stores. For knobs, the diameter varies, but the placement rule (2-3 inches down) remains the key factor.
Q4: How do I ensure my pulls are straight on slab doors?
Use a reliable cabinet hardware jig. This tool ensures that every pull is drilled at the exact same height and centered perfectly on every slab door, avoiding any crooked lines across the kitchen.
Q5: Should cabinet hardware placement be the same on shaker and slab doors?
The vertical measurement should be the same for visual consistency. However, the horizontal placement might differ slightly. On shaker doors, pulls usually sit on the stile wood. On slab doors, the pull is centered across the entire door width. Ensure the hardware never overlaps the edge of the stile on shaker doors.