
The best backsplash placement in your kitchen is primarily dictated by the area between the lower cabinets and the upper cabinets, often referred to as the kitchen counter to cabinet backsplash zone. However, backsplash placement can extend beyond this standard area to include full walls behind cooking ranges or even up to the ceiling for a more dramatic look.
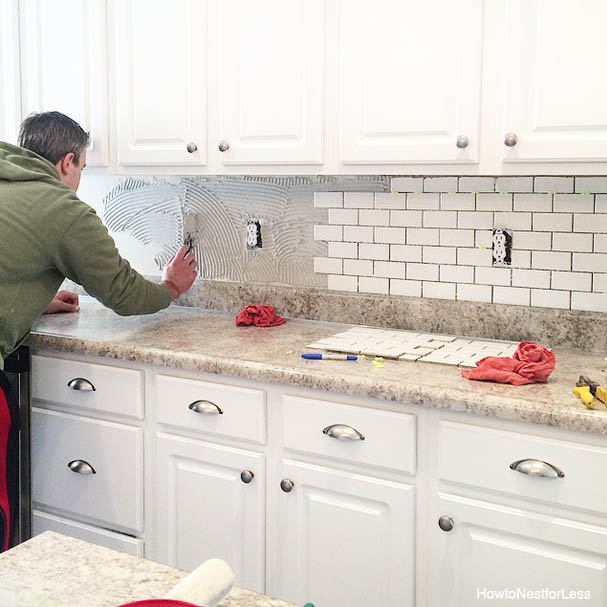
Image Source: howtonestforless.com
Deciphering the Standard Backsplash Zone
Most homeowners start their kitchen renovation backsplash guide by focusing on the area above the countertop. This is the most crucial spot for backsplash tiles or panels. Why? Because this space faces direct splatters from food prep, cooking, and sink use. The backsplash acts as a protective barrier. It keeps water, grease, and food particles from soaking into the drywall behind it.
Height Matters: How High to Put Backsplash
A key question for many DIYers and homeowners is how high to put backsplash. There are several common standards, but they all serve the purpose of protection and aesthetics.
The Minimalist Approach: A 4-Inch Splash
Some kitchens use a very short backsplash, often just 4 inches high. This usually means using the same material as the countertop (like quartz or granite) to run up the wall a small distance.
- Pros: It is cost-effective. It hides the seam where the counter meets the wall.
- Cons: It offers minimal splash protection above that 4-inch line.
The Standard Full Coverage
The most popular choice for kitchen backsplash installation covers the entire area between the counter and the bottom of the upper cabinets. This height is typically between 18 and 20 inches.
- This height offers excellent protection for the most active prep zones.
- It allows for creative tile layouts.
- If you are using standard 12-inch tiles stacked three high, 18 inches works perfectly.
Subway Tile Backsplash Height Rules
If you are using subway tile backsplash height is often determined by grout lines and visual appeal. A common layout for subway tile aims for:
- Three full tiles high (18 inches total): This is very common and fits well with standard cabinet depths.
- Four full tiles high (24 inches total): This provides extra protection and often aligns better visually if your upper cabinets are taller or if you have no upper cabinets above the area.
Full Wall Backsplash Ideas: Going Beyond the Standard
For a truly custom look, many designers advocate for full wall backsplash ideas. This involves extending the backsplash material up to the ceiling or to the bottom of the range hood.
This works especially well in areas without upper cabinets, like a coffee bar or a dedicated baking station. It turns the wall into a major design feature.
Placement Behind Cooking Appliances
The placement of the backsplash material around the range or cooktop is highly important, both functionally and visually. This area needs robust protection.
Kitchen Wall Tile Behind Stove
When talking about the kitchen wall tile behind stove, this spot is often treated as the focal point. Grease and heat are most intense here.
- Material Choice: You must choose materials that can handle heat well. Porcelain, ceramic, glass, and natural stone are generally safe, but always check manufacturer guidelines for proximity to intense heat sources.
- Visual Emphasis: This section often features a decorative element. You might use a different tile pattern, a contrasting color, or a unique material like metal or glass mosaic here, even if the rest of the backsplash is simple subway tile. This technique draws the eye.
Range Hood Integration
If you have a chimney-style range hood that goes straight up to the ceiling, extending the backsplash material behind and around it creates a cohesive, custom chimney effect. This demands precise cuts and measurements, often requiring professional kitchen backsplash installation.
Evaluating Placement Options Beyond the Main Prep Area
While the zone between the counter and upper cabinets is primary, backsplash materials are not strictly limited to that space. Your design choices affect where else you might place tile or paneling.
Backsplash Behind the Refrigerator
Do you need a backsplash behind the fridge? Functionally, no. Refrigerators sit flush against the wall, and this area sees no splatter.
However, if you have a built-in or counter-depth refrigerator, you might consider continuing the backsplash material around the corner onto the adjacent wall, just for a few inches. This ties the design together, especially if the adjoining wall is visible from the main kitchen area. This subtle continuation elevates the look of decorative kitchen wall paneling around appliance niches.
Backsplash Under Open Shelving
If you opt for open shelving instead of traditional upper cabinets, the backsplash placement becomes even more critical. Since there is no cabinet bottom to stop the eye, the backsplash usually runs the full height of the wall space available beneath the shelves, often reaching the ceiling if the shelves are mounted low.
This is a popular choice for modern farmhouse or industrial looks. It allows the backsplash material to become the main backdrop for your displayed dishware.
Splash Protection on Islands and Peninsulas
Islands and peninsulas present unique placement decisions.
Island Back Wall
If your island has seating, the wall behind the seating area usually does not need protection. However, if one end of the island houses a prep sink or a microwave drawer, you should treat that section like a standard counter run and install a backsplash there.
Waterfall Edges
When using solid surface counters (like quartz or marble) that flow down the side of the island to the floor (a waterfall edge), the material on the side acts as a low backsplash. You generally do not need to tile the area above the counter on that side unless you have an upper cabinet running parallel to it.
Material Considerations Dictating Placement
The material you choose significantly influences where and how high you should install your backsplash. Not all materials handle moisture or heat equally well.
Natural Stone Tiles
Materials like marble or certain porous stones look stunning. They often require sealing.
- Placement Note: If using genuine marble, designers often recommend running it higher (perhaps 24 inches or more) because the material is expensive and looks luxurious when fully showcased. However, be aware that unsealed marble stains easily from oil splatters.
Sheet Materials (Slab Backsplashes)
Using a single slab of quartz, granite, or sintered stone that runs kitchen counter to cabinet backsplash height is incredibly popular now.
- Benefit: There are no grout lines to clean! This is the ultimate low-maintenance solution.
- Placement Note: Because these slabs are costly, they are usually limited to the standard 18-20 inch height unless you are designing a very high-impact feature wall where the slab runs floor-to-ceiling.
Metal and Decorative Panels
Metal tiles or specially treated decorative kitchen wall paneling can offer a unique look.
- Heat Sensitivity: Metals like copper or stainless steel are excellent choices behind a stove due to their heat resistance and ease of cleaning. For these, extending the material up to the bottom of the hood or even higher is visually appealing.
- Installation: These materials often require specialized adhesives and cutting techniques, making professional kitchen backsplash installation advisable.
Table: Placement Scenarios and Recommendations
This table summarizes where you might place your backsplash material based on kitchen layout features.
| Kitchen Feature | Standard Placement Recommendation | Height Guidance | Design Justification |
|---|---|---|---|
| Main Counter Run | Between countertop and upper cabinets. | 18 to 20 inches (standard) | Protection from daily spills and splashes. |
| Behind Range/Cooktop | Extends from counter up to the range hood base (or ceiling). | Full height of the visible wall section. | Maximum heat and grease protection; creates a focal point. |
| Under Open Shelves | From counter all the way up to the shelf bottoms or ceiling. | Varies based on shelf height. | Provides a complete backdrop for displays. |
| Island Prep Sink Area | Behind the sink only, if located against a wall. | 18 to 20 inches. | Protects the wall where water splashes occur. |
| Short Counter Sections | Often left bare or uses a 4-inch stone lip. | 4 inches maximum. | Minimal food prep occurs in these low-splatter zones. |
Factors Guiding Your Final Placement Decisions
Choosing the exact height and boundaries for your backsplash involves looking at several factors beyond just basic protection.
Visual Flow and Cabinetry Lines
The eye likes clean, horizontal lines. When deciding how high to put backsplash, check how it aligns with the bottom edge of your upper cabinets.
- If your cabinets are exactly 18 inches off the counter, an 18-inch backsplash looks perfectly balanced.
- If you have taller, 54-inch cabinets (common in modern designs), a 20-inch backsplash might look slightly short. In this case, bumping up to 22 or 24 inches can better balance the taller cabinet profile.
Grout Line Alignment
Grout lines are the unsung heroes (or villains) of tile placement. When planning kitchen backsplash installation, always dry-lay your chosen tile (or mock it up digitally) to see where the grout lines fall.
- You want to avoid having awkward, tiny slivers of tile at the very top or bottom where the backsplash meets the cabinet or counter. Adjusting the height by an inch or two can often solve this by allowing the tile rows to end cleanly.
Budget Constraints
Tile is priced by the square foot, but labor for installation increases dramatically the higher you go or the more complex the cuts are.
- A 4-inch splash costs the least in material and labor.
- A full wall application, especially using intricate backspalsh ideas for kitchen like mosaics or complex patterns behind the stove, will increase labor costs significantly. Every extra foot of height adds labor hours.
Exploring Decorative Kitchen Wall Paneling Beyond Tile
While most people think of tile, the term backsplash area can also accommodate other treatments. Decorative kitchen wall paneling offers a unique textural element.
Wood Paneling (Shiplap or Beadboard)
Wood panels can provide a warm, rustic feel.
- Crucial Warning: If you use wood paneling near the stove or sink, it must be treated, sealed, or painted with a highly durable, moisture-resistant finish. Wood is susceptible to water damage and grease absorption.
- Placement: Because wood is harder to clean than tile or stone, it is often best reserved for lower-splatter areas, like the space behind an island seating area, or kept to the standard 18-inch height everywhere else.
Pressed Tin or Metal Sheets
These materials offer a vintage or industrial flair. They are often installed in large sheets.
- Installation: These generally require fewer cuts than small mosaic tiles, speeding up the kitchen backsplash installation process, but they demand perfectly flat walls for a seamless look. They are excellent choices for a full wall backsplash ideas feature behind a cooktop.
Professional Tips for Seamless Installation
Achieving a flawless finish, especially with complex tile patterns or slab materials, relies on meticulous planning.
Prepping the Wall Surface
No matter where you place your backsplash, the wall must be clean, dry, and flat. If the wall is uneven, the tiles or panels will look wavy, especially with reflective surfaces like glossy glass.
Sealing and Grouting
Proper sealing is vital if you use porous materials like natural stone or cement-look tiles. Sealing the grout lines after curing prevents oil and colored liquids from staining the material permanently. This is key to long-term satisfaction with your chosen backspalsh ideas for kitchen.
Working Around Outlets and Switches
Outlets and light switches interrupt the plane of the backsplash.
- Depth: Ensure your chosen material thickness works with your switch plate depth. Thick ledger stone or slab materials might require special “recessed” outlet boxes to keep the plate flush with the tile surface. This is a detail often missed in amateur installations.
Finalizing Your Kitchen Backsplash Placement Strategy
The decision on where to put your backsplash boils down to three main goals: protection, aesthetics, and budget.
- Protection First: Always cover the primary splash zones: behind the sink and behind the cooking surface, extending at least 18 inches high.
- Aesthetics Second: Use the backsplash material to define the style of the kitchen. If you use an expensive, high-impact tile, limit it to the main feature wall behind the stove. If you choose an affordable, durable option like simple white subway tile, you can comfortably extend it across all kitchen counter to cabinet backsplash areas for a uniform look.
- Budget Last: A full wall of tile is beautiful but costly. A standard 18-inch height is the most economical way to get maximum impact and protection.
By carefully considering these zones and material needs, you can ensure your kitchen renovation backsplash guide results in a space that is both beautiful and practical for years to come.
Frequently Asked Questions (FAQ)
Can I use wallpaper as a kitchen backsplash?
Yes, you can use specialized, vinyl-coated wallpaper designed for high-moisture areas as a backsplash, but it should generally be limited to areas with very low splash, such as behind a coffee station or a low-traffic counter. It should never be placed directly behind the stove or sink, as moisture and heat will quickly destroy it.
What is the standard grout color to use with subway tile?
For classic subway tile backsplash height installations, a light gray or white grout is standard. Light gray helps hide minor dirt accumulation while keeping the look bright. Dark charcoal grout is often used intentionally to highlight the shape and pattern of the individual tiles.
Do I need to install a backsplash if I have stainless steel behind my stove?
If you have a stainless steel range hood enclosure that extends down to the cooktop, or if the entire wall behind the stove is clad in stainless steel sheeting, you might skip additional tiling in that specific zone. The stainless steel itself functions as the durable backsplash, though many people still tile the lower counter area for visual continuity.
How do I handle the transition when the backsplash meets the cabinet end panel?
When the backsplash meets the side of a cabinet run, the goal is a clean finish. If the tile runs all the way to the end, use a finishing trim piece—often a small pencil liner or quarter-round trim made from the same material—to cap the edge of the tile run. This gives a professional, finished look to the kitchen backsplash installation.