
When replacing an old kitchen sink or planning a new kitchen layout, knowing the exact kitchen sink dimensions is the most crucial first step. Accurately measuring your sink ensures the new unit fits perfectly into your existing countertop cutout or cabinet base.
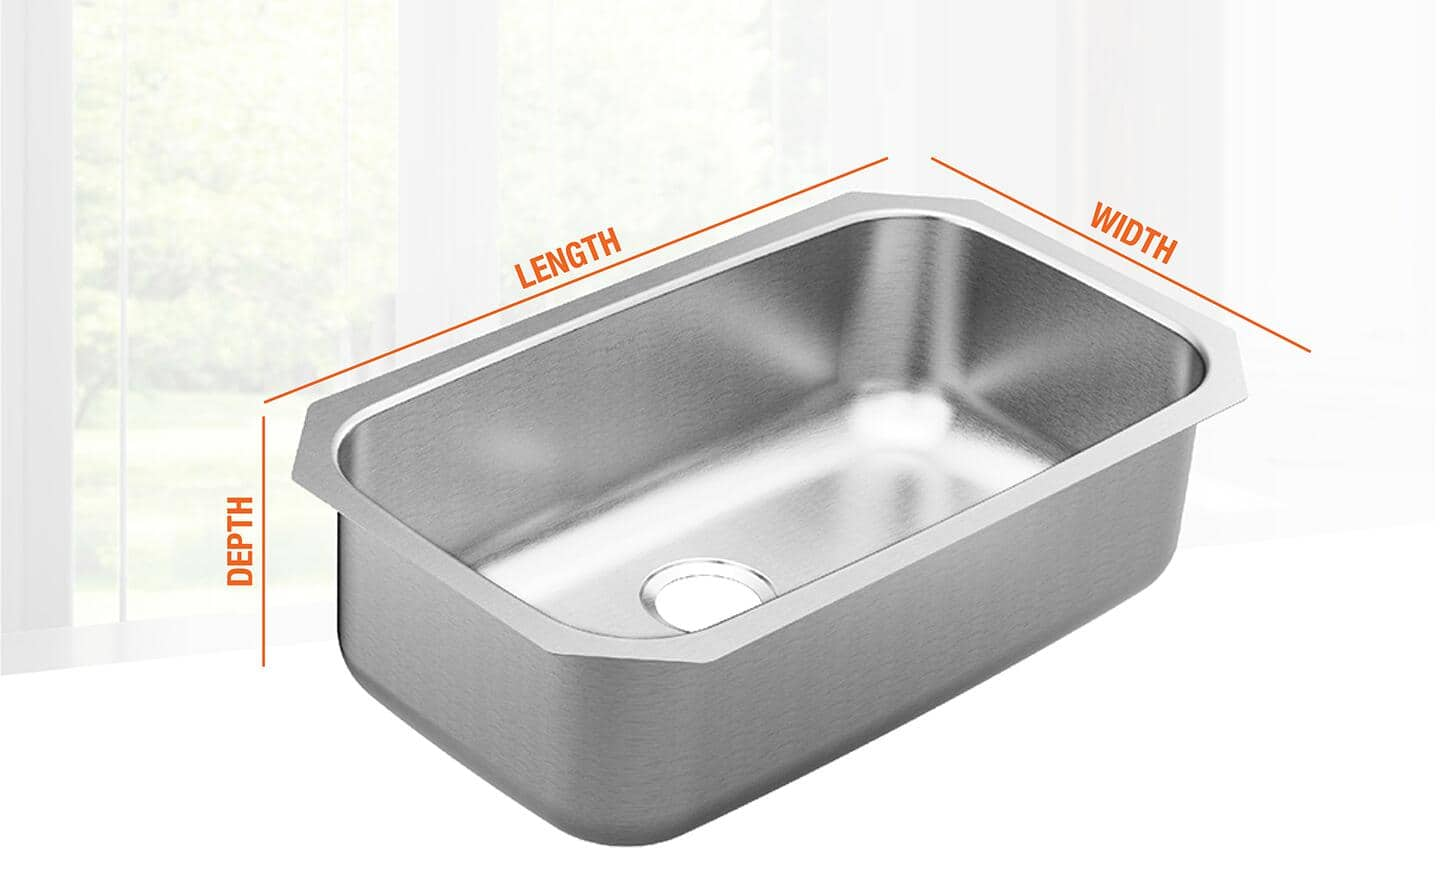
Image Source: dam.thdstatic.com
Why Precise Measurement Matters
Getting the right measurements prevents costly mistakes. A sink that is too large won’t fit the hole. A sink that is too small leaves unsightly gaps or requires expensive countertop modifications. This guide breaks down the process clearly so you get it right the first time.
Key Areas to Measure
You must measure three main things when dealing with a sink:
- The Sink Itself: This applies if you are buying a new sink based on its specs.
- The Countertop Cutout: This is the hole already made in your counter. This is vital for drop-in sink cutout template needs.
- The Cabinet Base: This is the space below the counter where the sink rests. This is key for undermount sink installation measurements.
Measuring Your Existing Sink for Replacement
If you are swapping out an old sink for a new one, you need the kitchen sink dimensions of the unit currently installed.
Measuring Drop-In (Top Mount) Sinks
Drop-in sinks sit right on top of the counter. Their measurements are easier to check.
Measuring the Overall Sink Dimensions
Use a reliable tape measure. Measure from the furthest edge to the furthest edge.
- Length: Measure the longest side across the top rim.
- Width: Measure the shortest side across the top rim.
Record these numbers clearly. These are the overall exterior dimensions.
Measuring the Sink Basin Size
The basin is where the water goes. You need the sink basin size if you plan to match or compare bowls.
- Measure the inside length of the bowl.
- Measure the inside width of the bowl.
- Measure the inside depth of the bowl. These measurements help determine standard kitchen sink depths.
Measuring Undermount Sinks
Undermount sinks attach below the countertop. Measuring these requires looking under the counter.
Determining the Required Cutout Size
For an undermount replacement, you need to measure the opening in the stone or laminate.
- Look below the counter where the sink rim meets the stone.
- Measure the length of the opening.
- Measure the width of the opening.
Important Note: For undermount sinks, the new sink exterior should be slightly smaller (about 1/8 inch on all sides) than the existing cutout. This ensures it drops in securely.
Measuring Double Bowl Sinks
If you have a measuring double bowl sink, you need to account for the divider.
- Measure the total length and total width as if it were one unit.
- Measure each bowl separately for its sink bowl length and width.
- Note the height of the central divider between the two bowls.
| Measurement Point | Description | Example Measurement (Inches) |
|---|---|---|
| Total Exterior Length | Edge to opposite edge | 33 |
| Total Exterior Width | Edge to opposite edge | 22 |
| Left Bowl Length (Inner) | Inside wall to inside wall | 15 |
| Right Bowl Length (Inner) | Inside wall to inside wall | 15 |
| Divider Width | The space between the bowls | 1.5 |
Measuring for a New Installation: Cabinet and Countertop
If you have a new kitchen or are installing a completely new countertop, your starting point is the cabinet that will hold the sink.
Fathoming Cabinet Base Requirements
The cabinet space dictates the largest sink you can install. Always measure the interior dimensions of the base cabinet.
Measuring the Cabinet Interior
- Cabinet Width: Measure the inside distance from the left cabinet wall to the right cabinet wall. This determines the maximum sink width you can use.
- Cabinet Depth: Measure from the back wall of the cabinet to the front frame or doors. This limits how deep the sink can extend front-to-back.
Rule of Thumb: Most sinks require at least 1/2 inch clearance on all sides inside the cabinet for easy fitting and plumbing access. If your cabinet is 36 inches wide, you generally cannot install a sink wider than 34.5 inches externally.
Deciphering Countertop Cutout Requirements
The countertop cutout is defined by the sink type you choose.
For Drop-In Sinks
Drop-in sinks require a hole slightly smaller than the sink’s overall exterior dimensions.
- Measure the existing hole. This gives you the maximum allowable size for your new sink’s flange (the rim).
- If creating a new hole, you need the drop-in sink cutout template provided by the sink manufacturer. This template shows the exact hole size needed based on the sink’s rim size.
For Undermount Sinks
Undermount sinks require careful measurement of the countertop material itself.
- Measure the interior dimension of the cabinet opening (as detailed above).
- The cutout in the stone must match the interior dimensions of the sink basin, plus a small allowance for clip placement.
- For undermount sink installation measurements, you look at the sink bowl size, not the exterior flange size. The countertop hole should match the desired sink bowl length and width closely. Consult the sink’s specific template.
Special Sink Sizing Considerations
Not all sinks are simple rectangles. Different sink styles have unique measuring needs.
Measuring Single, Double, and Triple Bowls
Measuring single bowls is straightforward (Length x Width). Double bowls require the layout to fit the cabinet.
- Offset Bowls: If one bowl is larger than the other (e.g., 60/40 split), ensure the smaller bowl fits your prep needs and the larger bowl fits your pots.
- Triple Bowls: These are often used in large kitchens or commercial settings. Ensure your cabinet is wide enough (usually 42 inches or more) to house the three bowls and two dividers comfortably.
Workstation Sink Sizing Guide
Workstation sink sizing guide involves more than just the main basin. These sinks have integrated ledges for cutting boards and colanders.
- Overall Footprint: Measure the total exterior length and width. This must fit your cabinet base.
- Ledge Clearance: Check the distance from the front edge to the first ledge, and the distance between ledges. This ensures your accessories slide smoothly.
- Standard depths for workstation sinks are often deeper than traditional sinks (9 to 10 inches) to handle large cookware.
Prep Sink Measurements
A prep sink measurements guide is crucial if you are adding a secondary sink, often called a bar sink or island sink.
- Prep sinks are typically small—often 15 to 18 inches in length.
- Measure the available countertop space on the island or peninsula.
- Since they are often used with drop-in installation, ensure the rim doesn’t overlap with electrical outlets or cabinet bracing underneath.
Faucet Hole Spacing Measurement
The location of the faucet holes affects whether your new faucet will fit the existing sink deck or countertop preparation.
Interpreting the Faucet Hole Pattern
Sinks come with pre-drilled holes for the faucet, sprayer, soap dispenser, etc.
- Standard Faucet Hole Spacing Measurement: The standard spacing between the center of the main faucet hole and the center of any accessory holes (like a side sprayer) is usually based on a 3-hole configuration (8 inches center-to-center).
- One-Hole Sinks: These are becoming popular, accommodating modern single-handle faucets.
- No Holes (For Granite/Solid Surface): If the sink has no holes, the faucet will mount directly onto the countertop surface behind the sink rim.
Action Step: If you are replacing a sink with pre-drilled holes, measure the distance between the outermost holes to ensure your new faucet set aligns. If you are moving to a sink with fewer holes, you might need to use a deck plate or drill new holes in the counter (only feasible with certain materials).
Determining Standard Kitchen Sink Depths
Knowing the standard kitchen sink depths helps you decide between style and practicality. Depth is measured from the top rim down to the bottom surface of the basin.
Depth Ranges
| Sink Type | Typical Depth Range (Inches) | Common Uses |
|---|---|---|
| Standard Kitchen Sink | 8 to 9 inches | General daily use. |
| Deep Basin Sink | 9.5 to 10 inches | Washing large pots and baking sheets. |
| Shallow/Prep Sink | 5 to 7 inches | Secondary use, quick rinsing. |
Deeper sinks (9 inches and up) are often preferred because they hide dirty dishes better and splash less water onto the counter. However, very deep sinks can strain the back if you are short, as you have to bend further down to reach the bottom.
Step-by-Step Guide: Measuring for a New Sink Installation
Follow these steps when you are starting fresh or replacing a sink where the old cutout is unknown or being modified.
Step 1: Identify Sink Type (Drop-In vs. Undermount)
Your choice dictates what you measure first.
- Drop-In: You measure the cabinet first, then the required hole size based on the sink you select.
- Undermount: You measure the cabinet first, then confirm the required undermount sink installation measurements against the cabinet interior space.
Step 2: Measure the Cabinet Base
Use a reliable tape measure. Measure the interior space of the cabinet that will hold the sink.
- Measure from the inside of the left wall to the inside of the right wall (Width).
- Measure from the inside of the back wall to the cabinet front frame (Depth).
Step 3: Check for Obstructions
Look inside the cabinet. Are there garbage disposals, soap dispensers, or water filters already installed?
- Note the location of existing plumbing pipes (supply lines and drains).
- Ensure the depth you want for the new sink does not interfere with the garbage disposal unit or the angle of the drain pipes when they connect to the P-trap.
Step 4: Select Your Sink and Review Specifications
Once you have your maximum cabinet dimensions, shop for sinks that are smaller than your maximum.
- When you find a sink you like, check its specification sheet. Look for the “Overall Dimensions” and the “Cutout Dimensions.”
Step 5: Confirming Drop-In Template Placement
If installing a drop-in, you need to place the template accurately on the countertop.
- Find the center point of the desired sink location on the counter.
- Mark the midpoint of the sink’s length and width on the template.
- Align these marks with the center point on the counter.
- Ensure the template has adequate space (at least 2.5 to 3 inches) between the edge of the hole and the edge of the countertop/wall, especially near the backsplash area.
Step 6: Finalizing Undermount Placement
For undermount sinks, placement is critical for even overhang.
- Place the sink bowl upside down on the underside of the counter.
- Mark the exact perimeter of the sink where it will sit.
- The required cutout is usually marked 1/4 inch to 1/2 inch inside the perimeter you just drew. This slight offset provides a supportive lip for the clips and sealant. Use the manufacturer’s precise template if provided.
Measuring for Specialized Sinks
Different applications require specific measurement techniques.
Measuring Utility Sinks
Utility sinks (laundry tubs) are often much deeper and might be installed in a freestanding base or wall-mounted.
- For wall-mounted sinks, measure the distance between the mounting holes on the back of the sink. You must ensure these match the studs or mounting brackets on your wall.
- Utility sinks focus more on capacity than aesthetics, so measure the cubic volume if necessary, but focus mainly on the overall footprint fitting the utility area.
Measuring Integrated Drainboards
Some sinks have a built-in drainboard area sloping toward the main basin.
- Measure the total width, including the drainboard extension.
- Check the cabinet width required. Drainboards often require a wider cabinet than a standard rectangular sink of the same basin size. For example, a 33-inch sink with a drainboard might need a 36-inch cabinet base.
Readability Focused Summary of Key Measurements
Keep these simple guidelines in mind when you measure. Use short, clear language.
- Cabinet Space: Always measure the inside of the base cabinet. The sink must fit inside this box.
- Drop-In Sink: Measure the outside rim of the old sink. The new sink rim must be slightly smaller than the existing hole.
- Undermount Sink: Measure the inside hole of the counter. The new sink bowl must be slightly smaller than this hole.
- Depth: Check standard kitchen sink depths (8 to 10 inches). Make sure the depth allows your disposal to fit underneath.
- Faucets: Count the existing holes. Check the faucet hole spacing measurement if reusing an old faucet.
Frequently Asked Questions (FAQ)
What is the standard depth for a kitchen sink?
The standard kitchen sink depths usually range from 8 to 9 inches deep for the basin. Some modern, deep sinks go up to 10 inches or more.
Can I install an undermount sink if I have a laminate countertop?
Generally, no. Undermount sink installation measurements require a solid surface material like granite, quartz, or marble that resists water damage at the exposed cut edge. Laminate edges will swell and deteriorate when exposed to water under the counter.
What measurement is needed for a drop-in sink cutout template?
The template requires the exact dimensions of the hole needed to sit the sink flange on. This hole is always slightly smaller than the sink’s overall exterior dimensions to allow the rim to support the sink weight. Always use the template provided by the sink maker.
How do I measure a double bowl sink accurately?
For a measuring double bowl sink, record the total length and width first. Then, measure the inside dimensions (sink bowl length and width) of each bowl separately, along with the width of the divider separating them.
What is the measurement for faucet hole spacing?
The most common configuration requires 1.5 inches of space between the centers of adjacent holes. A standard three-hole sink typically has 8 inches between the center of the farthest holes, but always confirm this against your specific faucet model.
Are prep sink measurements different from main sinks?
Yes. Prep sink measurements are usually much smaller, focusing on a compact design (often 15 to 18 inches long). They must still fit within the available cabinet space below the countertop.