
When should you throw out a kitchen sponge? You should replace your kitchen sponge every one to two weeks, or immediately if it starts to smell bad, look frayed, or feel slimy, regardless of how long you have been using it.
The kitchen sponge is a true workhorse. It wipes up spills. It scrubs stuck-on food. It cleans counters. But this small, porous square holds a big secret: it can be one of the dirtiest things in your entire home. For many people, knowing the proper kitchen sponge lifespan is a mystery, leading to prolonged use that risks spreading germs. This guide aims to clear up all confusion about replacing dish sponges frequency and keeping your cleaning tools safe and effective.
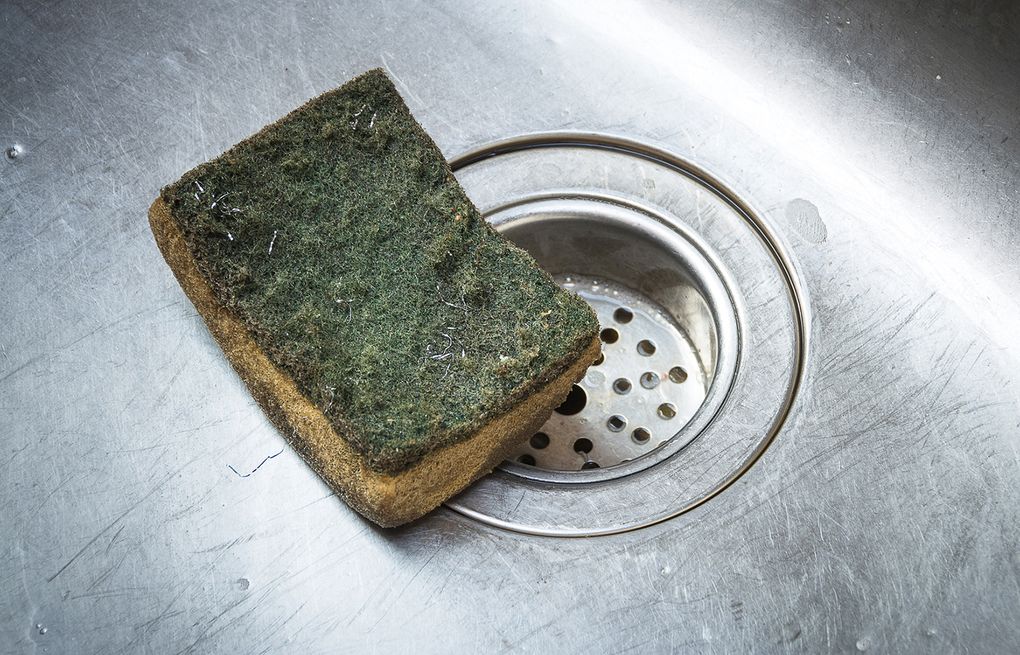
Image Source: images.seattletimes.com
The Hidden World Inside Your Sponge
It might look clean after a quick rinse, but your sponge is a thriving ecosystem. Sponges offer the perfect conditions for germs to live and grow. Think about it: they are often damp, warm, and full of food particles (like bits of food left on plates). This environment is ideal for microbial growth in kitchen sponges.
Why Sponges Get So Dirty
We use sponges to wipe up everything. We clean raw chicken juices one minute and sticky jam the next. This transfers bacteria everywhere. Studies have shown that dirty sponges can harbor millions of bacteria cells. This is far more than you might find on a toilet seat! Common bacteria found in kitchen sponges include E. coli and Salmonella. These germs can cause food poisoning if they are spread to surfaces or dishes.
How Long Do Kitchen Sponges Last?
The simple answer to how long do kitchen sponges last depends heavily on usage and cleaning habits.
- Average Use: For a typical household using a sponge daily, the safe recommendation is replacement every one to two weeks.
- Heavy Use: In a busy kitchen, perhaps one with many meals cooked daily, you might need to replace it sooner, maybe every four to seven days.
- Infrequent Use: Even if you don’t use it often, moisture can still lead to mold and smell. If kept damp, a sponge should still be tossed after two weeks.
We need to look beyond just time. We must also focus on the signs your kitchen sponge is dirty.
Deciphering The Signs Your Kitchen Sponge Is Dirty
Time is a guideline, but your senses are often the best judge. Knowing the signs your kitchen sponge is dirty means throwing it out before it spreads germs. Do not wait until the recommended time if you spot these issues.
Smell Test: The Biggest Warning
The most obvious sign a sponge needs immediate replacement is a foul odor. Bacteria break down the food particles left behind, releasing smelly compounds. If your sponge smells sour, musty, or just plain “off,” that smell is bacterial waste. Toss it right away. No amount of soaking will likely fix a deeply smelly sponge.
Visual Cues That Signal Replacement
Look closely at the sponge. Do you see anything unusual?
- Discoloration: If the sponge has dark spots, pink, green, or black patches, this is likely mold or mildew growth. Get rid of it.
- Fraying and Crumbling: When the sponge starts to fall apart, its structure is compromised. It cannot clean well, and the tiny broken pieces can harbor more germs deep inside. This signals the end of its kitchen sponge lifespan.
- Slimy Texture: If the sponge feels strangely slick or slimy even after rinsing, it is covered in a biofilm—a sticky layer of microorganisms. This is a major hygiene risk.
Performance Decline
Does the sponge feel less abrasive? Does it fail to pick up dirt the way it used to? A worn-out sponge cannot scrub effectively. It just pushes germs around instead of removing them. If it is not cleaning well, it is time for replacing dish sponges frequency to be adjusted sooner.
The Importance of Cleaning Kitchen Sponges Regularly
Throwing out a sponge every week seems wasteful to some. You can extend its life safely if you practice cleaning kitchen sponges regularly. Regular sanitizing greatly reduces microbial growth in kitchen sponges. This is about proper care, not endless use.
How to Properly Sanitize Your Sponge
There are three proven, easy methods for disinfecting kitchen sponges. Doing this daily or every other day can significantly boost your kitchen sponge lifespan.
Method 1: Microwave Sanitization (The Quickest Fix)
This method effectively kills most germs. Be cautious, as it involves high heat.
- Soak Fully: Make sure the sponge is completely wet. A dry sponge can catch fire in the microwave.
- Microwave Time: Place the wet sponge in the microwave. Heat it on high power for one to two minutes.
- Cool Down: Let the sponge cool completely before handling it. It will be extremely hot.
Method 2: Bleach Solution Soak (The Deep Clean)
Bleach is excellent at killing surface bacteria. Use this method weekly.
- Mix Solution: Mix about three-quarters cup of bleach into one gallon of water.
- Soak: Submerge the sponge completely in the solution for five minutes.
- Rinse Well: Squeeze out the sponge thoroughly and rinse it several times under hot running water until no bleach smell remains.
Method 3: Dishwasher Sanitizing Cycle
If your dishwasher has a “Sanitize” or high-heat setting, use it!
- Secure Placement: Place the sponge in the top rack. Use a small cup or clip to hold it down so it does not fly around.
- Run Cycle: Run the dishwasher on the highest heat setting or the dedicated sanitize cycle. The high heat helps kill germs.
Note on Vinegar: While vinegar has mild cleaning properties, it is not strong enough to reliably kill major foodborne pathogens like Salmonella. Use bleach or the microwave for true disinfecting kitchen sponges.
A Sample Kitchen Sponge Replacement Schedule
To manage your hygiene effectively, follow a simple schedule combining cleaning and replacement:
| Action | Frequency | Purpose |
|---|---|---|
| Rinse and Squeeze Dry | After Every Use | Prevents immediate bacterial buildup. |
| Microwave/Bleach Soak | Daily or Every Other Day | Kills most germs; extends life. |
| Deep Dishwasher Sanitizing | Twice Per Week | High-heat sterilization. |
| Total Replacement | Every 1-2 Weeks | Final step to prevent biofilm takeover. |
This balanced approach addresses how often to replace kitchen sponge by actively maintaining it between replacements.
Comprehending Sponge Hygiene Tips for Longevity
To maximize the kitchen sponge lifespan, the way you treat the sponge after use matters just as much as sanitizing it. Good sponge hygiene tips focus on removing moisture quickly.
The Dry-Out Rule
Bacteria thrive in moist environments. The single best thing you can do to slow growth between cleanings is to ensure the sponge dries out completely after every use.
- Squeeze Hard: Squeeze out as much water as humanly possible.
- Airflow is Key: Do not leave the sponge sitting flat in the sink basin or in a puddle of water in a caddy.
- Use a Rack: Store the sponge on a raised rack, sponge holder, or even balanced on its thin edge where air can circulate around all sides.
Separating Tasks
If you are serious about hygiene, consider dedicated sponges for different jobs. This is a crucial sponge hygiene tip.
- Dedicated Sink Sponge: Use one sponge primarily for dishes and wiping down sink surfaces.
- Dedicated Counter Sponge: Use a separate cloth or scrub pad for wiping down food prep areas, especially after handling raw meat. Never use the same tool for both tasks without thorough sanitization in between.
Dealing with Raw Meat Juices
If you clean up raw chicken, beef, or pork juices with your main sponge, you must treat that sponge as contaminated. Immediately sanitize it using the microwave or bleach method, or better yet, throw it away and start fresh. This is critical for preventing cross-contamination.
Fathoming Microbial Growth in Kitchen Sponges
Why is the risk so high? It comes down to colonization. When you leave food debris and moisture, bacteria colonize the pores of the sponge.
Biofilms: The Enemy Within
A biofilm is a structured community of microorganisms encased in a protective slime layer they create. Once a biofilm forms in a sponge, it is very hard to break down, even with strong cleaning agents. The slime shields the inner layers of bacteria from disinfectants. This is often why a sponge starts to smell bad even after you rinse it—the biofilm is still there, just temporarily less active.
When you see that slimy texture, it means the biofilm is established, and the sponge has reached the end of its useful life. It is time for immediate replacement, regardless of the kitchen sponge replacement schedule you set.
The Role of Temperature
Warm, damp environments speed up the rate of reproduction for bacteria. Therefore, a sponge left near a hot dishwasher or in a sink full of warm, soapy water is breeding faster than one left to dry in cool, circulating air.
Grasping the True Cost of Not Replacing Sponges
Some people resist frequent replacement because of cost or waste. However, the potential cost of using an old sponge far outweighs the price of a new pack.
Health Risks
The primary risk is foodborne illness. When you wipe a counter with a dirty sponge, you are simply moving germs from one spot to another. This can contaminate fresh produce, clean dishes, and even your hands.
Reduced Cleaning Power
An old, flattened sponge loses its scrubbing power. You end up scrubbing harder and longer to achieve the same clean. This wastes time and energy. A new sponge offers better abrasion and absorption, making cleanup faster and more effective.
Environmental Factors (The Trade-Off)
While frequently tossing sponges creates plastic waste, remember that sanitation also extends life. By properly sanitizing, you might use only 2-3 sponges a month instead of 4-5, balancing waste concerns with health needs. The goal is to keep the sponge healthy for its full potential time frame.
Alternative Tools for Better Kitchen Hygiene
If you struggle with the short kitchen sponge lifespan, or if you simply want a healthier option, consider switching your primary tool.
Microfiber Cloths
Microfiber cloths are highly absorbent and generally dry faster than thick sponges. They are also very easy to clean. You can toss them into the washing machine with your regular laundry (use hot water) and dry them thoroughly. They are excellent for wiping down surfaces.
Scrub Brushes
For heavy scrubbing tasks, a stiff-bristled brush is superior. The bristles dry quickly, and it is much easier to sanitize a brush than a dense sponge.
Cellulose Sponges
Cellulose sponges are often more durable and less prone to breaking down than synthetic foam sponges. They also tend to dry faster, which inhibits microbial growth in kitchen sponges.
Disposable Wipes
For dealing with high-risk messes, like raw meat residue, using a disposable disinfecting wipe and immediately throwing it away is the safest choice. This avoids cross-contamination entirely.
FAQs on Sponge Care and Replacement
Here are quick answers to common questions about managing your sponges.
Can I just use my sponge to clean the sink after washing dishes?
Yes, but you must use the sponge before you clean the sink basin. After the sink is clean, the sponge has touched the dirtiest surfaces. If you use the sink sponge for the counters afterward, you risk spreading grime. It is best to use a dedicated rag or paper towel for the final sink clean, or follow up immediately with intensive disinfecting kitchen sponges.
Does putting a sponge in the dishwasher really clean it?
Yes, if you use a high-heat or sanitize setting. The sustained high temperature (above 160°F or 71°C) is what kills most bacteria, not just the soap. A regular, low-heat wash may not be sufficient for proper disinfecting kitchen sponges.
Is it okay to use the same sponge for dishes and counters?
Health experts advise against this. A sponge used on raw food prep areas should never be the same one cleaning your eating surfaces or dishes, unless you plan on thoroughly sanitizing it between tasks, which is inconvenient. Stick to sponge hygiene tips and use separate tools.
What is the best way to store my sponge to prevent smells?
Store it where it can dry completely. Avoid leaving it in the bottom of the sink or inside a closed container where humidity builds up. A simple wire rack that allows air circulation underneath is ideal for maximizing the kitchen sponge lifespan.
Final Thoughts on Your Kitchen Sponge Replacement Schedule
The kitchen sponge is an essential tool, but its convenience comes with a significant hygiene cost if mismanaged. While you can certainly try cleaning kitchen sponges regularly through microwaving or soaking to stretch their life, always respect the signs your kitchen sponge is dirty. When in doubt about its age, smell, or look, throw it out. Sticking to a strict kitchen sponge replacement schedule of one to two weeks ensures that the tool you use to clean your kitchen is not making it dirtier. Prioritize safety; a new sponge is a cheap investment in household health.