
Can I build a kitchen island myself? Yes, you absolutely can build a kitchen island yourself if you follow the right steps and use clear plans. Building your own island is a great way to save money and get exactly the look and function you want in your kitchen. This detailed kitchen island construction guide will walk you through every stage, from planning to the final touches.
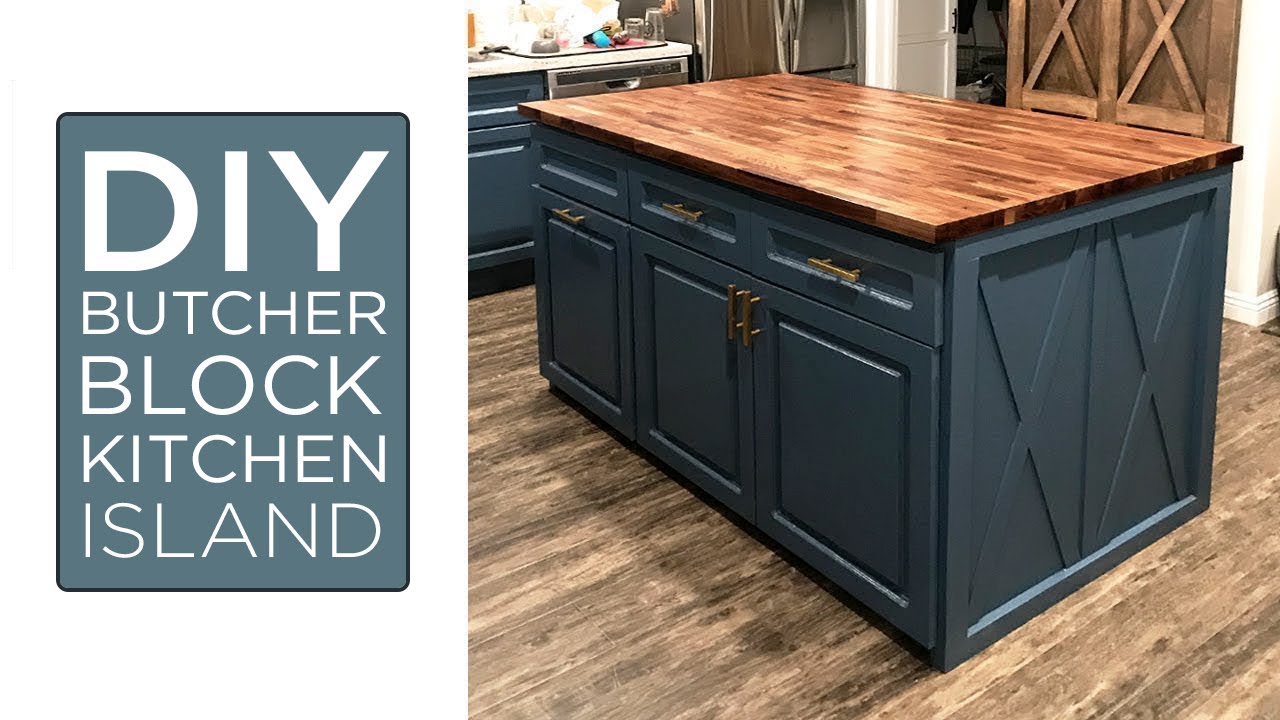
Image Source: i.ytimg.com
Planning Your Kitchen Island Project
Good planning prevents wasted time and materials. Before you pick up a single tool, you need a solid design and a clear layout.
Deciphering Location and Size Needs
Where will the island go? Measure the space carefully. You need enough room to walk around the island comfortably. Experts suggest at least 36 to 42 inches of clear space between the island and surrounding counters or walls.
Consider the island’s purpose. Will it be just for prep space? Does it need seating? Will it house a sink or a cooktop? These choices affect the size and the complexity of the build.
Gathering Essential DIY Kitchen Island Plans
You need blueprints for your build. You can find pre-made DIY kitchen island plans online or design your own based on your kitchen size. Ensure your plans include dimensions for the base, the top overhang for seating, and the location of any utilities like plumbing or electricity.
Key Measurements to Confirm:
| Element | Recommended Standard Range | Why It Matters |
|---|---|---|
| Height | 34 to 36 inches (standard counter height) | Comfort for standing work. |
| Depth | 24 to 48 inches | Enough space for storage and seating. |
| Clearance | 36 to 42 inches around all sides | Safe movement and opening appliance doors. |
Framing the Island Base
The base provides the support structure. Most DIY islands use simple lumber framing, similar to building a short wall section.
Preparing the Base Materials
Use sturdy lumber, like 2x4s or 2x6s, for the frame. Plywood sheathing will cover the frame later. Cut your lumber according to your plans. Measure twice, cut once!
Assembling the Outer Frame
Build the four sides of the frame first. Attach the vertical studs to the top and bottom plates. Make sure all corners are square (90 degrees). A carpenter’s square is essential here. Screw the pieces together using strong construction screws, not just nails, for better stability.
Adding Support and Shelves
Interior supports are crucial, especially if you plan to place heavy items like a granite top or appliances. Install cross-braces within the frame. If you plan for open shelving or fixed cabinets inside, build those supports now.
Securing the Base to the Floor
This step is vital for stability. Position the finished frame in its final spot. Use construction adhesive on the bottom plates for an initial grip. Then, drill pilot holes through the bottom plate and into the subfloor. Secure the frame using heavy-duty lag screws driven deep into the floor joists if possible. Hitting a joist makes the island rock-solid.
Incorporating Utilities (Plumbing and Electrical)
If your island will feature a sink or appliances that need power, you must plan for utility hookups before enclosing the frame. This is the trickiest part of building custom kitchen island projects.
Kitchen Island Electrical Wiring
If you want outlets, switches, or under-cabinet lighting, rough them in now.
- Determine Outlet Needs: Check local codes. Most kitchens require at least one outlet on the island.
- Run Wires: Cut holes in the framing studs where outlets will sit. Run the correct gauge wiring (usually 12-gauge for kitchen circuits) from the nearest power source, feeding it through the holes. Leave plenty of slack for later connections.
- Install Boxes: Secure plastic or metal outlet boxes to the studs. Do not wire the outlets yet; just run the wires through the boxes.
Selecting Kitchen Island Sink and Plumbing
If you chose a sink, you need water supply lines and a drain line stubbed up through the floor or subfloor where the sink cabinet will sit.
- Supply Lines: Run hot and cold water lines up to the correct height for the faucet connections.
- Drain Line: The drainpipe should align with the main drain opening in the floor. Ensure proper slope for drainage.
Safety Note: If you are not comfortable with plumbing or electrical work, hire a licensed professional for these stages. Improper utility installation can be dangerous.
Installing Cabinetry and Enclosing the Frame
Once the frame is sturdy and utilities are roughed in, it’s time to cover the frame and install the main storage units.
Kitchen Island Base Cabinet Installation
If you are using pre-made cabinets (the easiest route), they will form the bulk of your island structure.
- Positioning: Place the cabinets inside the framed area, ensuring they are level and square.
- Securing: Cabinets must be securely fastened. Screw the cabinets to each other where they meet. Then, screw the back of the cabinets into the surrounding lumber frame. If you are using a sink base, this cabinet often acts as a central anchor.
- Building Filler Pieces: Gaps often exist between the standard cabinets and the rough frame. Cut pieces of plywood or lumber to fill these voids. This ensures the countertop has solid backing everywhere.
Sheathing the Base
Cover the open sides of the frame (the areas not covered by standard cabinet fronts) with furniture-grade plywood. This creates a smooth surface ready for finishing (painting or staining). Use wood glue and short screws to attach the plywood firmly to the frame.
Preparing for the Countertop
The next major step is preparing the surface that will receive the slab. This requires precise measurement and structural support.
Finalizing Support for How to install kitchen island countertop
Heavy countertops (like stone) need robust support.
- Cleats and Brackets: If the countertop will overhang for seating, install sturdy cleats (angled pieces of wood) or metal hanging brackets underneath the framing where the overhang occurs. These brackets must be screwed deeply into the frame members.
- Leveling: Use shims under the base cabinets or frame to ensure the entire top surface is perfectly level before the countertop is set. Even slight tilts will be magnified when the slab is placed.
Addressing Kitchen Island Sink Installation Needs
If you are installing a drop-in sink, cut the necessary opening into the plywood top (if you are using a plywood sub-top) or provide instructions to the countertop fabricator. If you are using an undermount sink, the fabricator handles the precise cutout in the stone or solid surface material.
Finishing the Island Exterior
Before the heavy countertop goes on, finish the visible exterior surfaces.
Painting or Staining
Apply primer, then your chosen paint or stain to the plywood sheathing and any exposed wood trim. Do this now, as it is much harder to reach the lower areas once the countertop is installed.
Designing Kitchen Island Storage Solutions
This is where personalization shines. Think about what you use most.
- Drawers: Install drawer slides if your base cabinets don’t include them. Custom drawers can be built inside the framed areas.
- Pull-Outs: Consider pull-out shelves for trash cans or cleaning supplies.
- Bookcases: The ends of the island are great spots for open shelving for cookbooks.
Finalizing Electrical and Plumbing Connections
With the base finished and ready for the top, finalize the utility connections within the enclosed space.
Completing Kitchen Island Electrical Wiring
- Install Receptacles: Wire the outlets into the boxes. Ensure grounding is correct. Install the faceplates.
- Lighting: If you have pendant lights planned, now is the time to run the wire up through the framing to the ceiling location where the electrical box for the lights resides.
Hooking Up the Plumbing
Connect the faucet lines to the water supply valves. Connect the P-trap assembly to the sink drain and connect the drain to the stub-up line coming from the floor. Test the water supply for leaks immediately.
Installing the Countertop
This step often requires help, especially with stone slabs, as they are extremely heavy.
How to Install Kitchen Island Countertop
- Preparation: Ensure the support structure is clean and dust-free.
- Setting the Slab: Carefully lift the countertop onto the base. If it’s a large piece, use suction cups and several strong helpers.
- Securing: Apply a generous bead of construction adhesive (like silicone or epoxy) between the support frame/cleats and the underside of the countertop. Fasten the countertop to the frame using clips or specialized screws, driving them up from underneath into pre-drilled holes in the cabinet structure. Do not overtighten screws into stone; they can crack.
- Seaming (If Applicable): If your island requires multiple pieces, the fabricator will have created seams. These are joined with epoxy and polished on-site.
Choosing and Installing Seating and Lighting
These details personalize the island and increase its usability.
Kitchen Island Seating Options
Decide if you want seating flush with the counter or raised for bar seating. Remember the overhang rule: you need at least 10 to 12 inches of clear knee space under the overhang for comfortable seating.
- Stools: Purchase stools that fit the height of your counter (counter height stools for 36-inch counters, bar height stools for 42-inch counters).
Kitchen Island Lighting Ideas
Lighting defines the look and utility of the space.
- Pendants: Most common over islands. Ensure they hang at a height that doesn’t obstruct views but provides ample task lighting (usually 30 to 36 inches above the countertop).
- Recessed Lighting: Good for general ambient light in the kitchen, supplementing task lighting.
- Under-Cabinet Lighting: Useful if your island has cabinets facing the main kitchen area, providing soft glow.
Final Touches and Inspection
After all major components are in place, perform a final check.
- Clean Up: Seal any exposed edges on the stone top if required by the material.
- Test Everything: Turn on the water. Plug in an appliance to test the new outlets. Flip the light switches.
- Review: Look closely at the seams, trim, and finishes. Address any cosmetic imperfections.
Your robust, custom-built island is now ready for years of service!
Frequently Asked Questions (FAQ) About Building a Kitchen Island
Q1: How much does it cost to build a DIY kitchen island versus buying one pre-made?
Building a DIY island usually costs significantly less—often 30% to 50% less—than purchasing a ready-made unit, especially if you use stock cabinets for the base. The main expenses for DIY are lumber, plywood, hardware, and the countertop material.
Q2: Do I need a permit to build a kitchen island?
This depends heavily on your local building codes and what you are installing. If you are simply building a standalone piece of furniture (no plumbing or electrical work), a permit is usually not required. However, if you tie into existing plumbing or electrical systems, permits and inspections are almost always mandatory. Always check with your local building department first.
Q3: What is the best material for a kitchen island countertop for a DIY build?
For DIY builders, butcher block or laminate are the easiest and most affordable materials to cut and install yourself. Granite or quartz require professional templating and installation due to their weight and fragility during transport.
Q4: How do I ensure the island cabinets are perfectly aligned before setting the top?
Use long leveling screws inserted through the cabinet bottoms into the framed base structure. Use a reliable spirit level placed across the tops of all cabinets repeatedly as you tighten the screws. Shim any low spots until the entire row of cabinets reads perfectly level and flush.
Q5: What is the ideal depth for an island that includes seating?
For comfortable seating, aim for a depth of at least 36 inches for the base structure, providing a minimum 15-inch overhang past the cabinet face. This allows people to tuck their knees underneath easily.