
The best way to clean kitchen tile and grout involves a few steps, starting with regular sweeping and moving to deep cleaning solutions for tough stains. Kitchen floors get very dirty. Grease, spills, and foot traffic make tiles look dull and grout lines dark. This guide shows you simple ways to make your floor sparkle again. We will cover daily care, tough stain removal, and tips for keeping grout white.
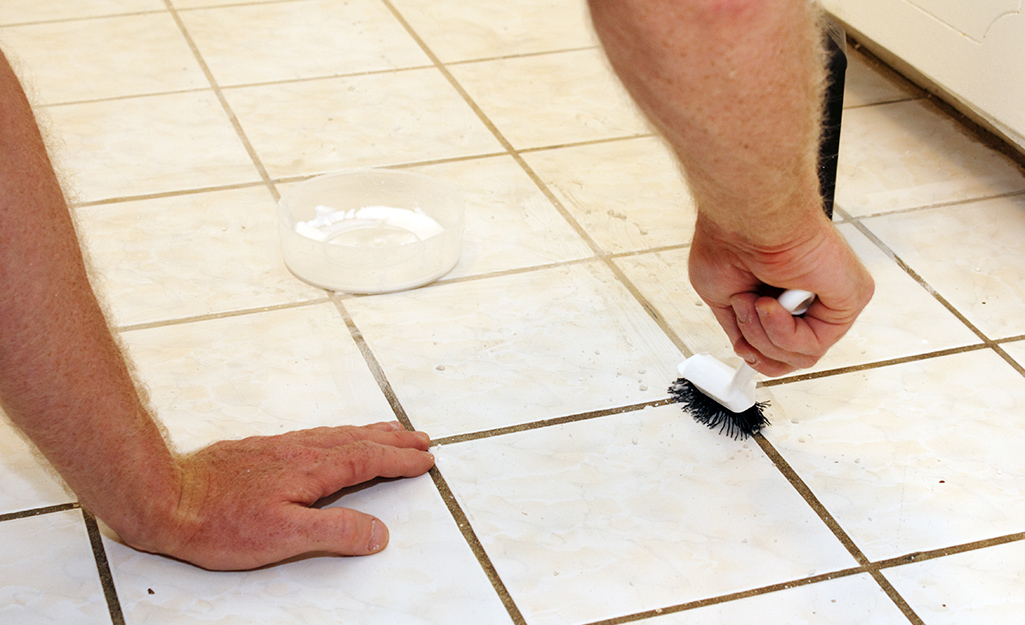
Image Source: contentgrid.homedepot-static.com
Preparing Your Kitchen Floor for Cleaning
Before you start scrubbing, getting the floor ready is important. This step removes loose dirt. It makes your cleaning products work much better. Think of it as clearing the stage before the main act.
Clearing the Area
Take everything off the floor. This means moving trash cans, small rugs, and stools. You need open space to work well. Sweeping or vacuuming is the first critical step.
Dry Removal of Debris
Use a soft-bristle broom or a vacuum cleaner with a hard floor attachment. This lifts dirt, crumbs, and dust. If you skip this, you might just push muddy water around during the wet clean. For cleaning dirty kitchen tile floors, this dry step saves time later.
Daily and Weekly Tile Maintenance
Keeping tiles clean daily prevents build-up. This means less hard work later. A little effort often saves a lot of scrubbing.
Quick Daily Wipe Down
For daily cleaning, a damp mop is often enough. Use warm water. If you notice spills, wipe them up right away. Dried food or grease is much harder to remove later.
Weekly Mopping Routine
Once a week, give the floor a proper mop. Use a mild cleaner designed for tile. Avoid harsh chemicals for weekly use. They can dull the shine over time.
Simple Weekly Cleaning Recipe:
- Mix warm water with a few drops of dish soap.
- Dip your mop in the solution. Wring it out well. The mop should be damp, not soaking wet.
- Mop the floor in sections.
- Rinse the mop often in clean water.
- If time allows, dry the floor with a clean towel. This stops water spots.
Tackling Kitchen Tile Grout Cleaning
Grout lines are porous. They act like sponges for dirt and grease. This is where most people struggle. Kitchen tile grout cleaning requires specific focus.
Why Grout Gets So Dirty
Grout is cement-based. It has tiny holes. Cooking grease splashes onto the floor. Foot traffic grinds this dirt deep into the grout lines. Moisture also causes mildew or discoloration.
Choosing the Right Tools for Grout
You cannot use a regular mop on grout effectively. You need a tool that gets deep into the narrow lines.
- Stiff-bristle brush: A nylon brush works well for light cleaning.
- Old toothbrush: This is perfect for small areas or very narrow grout lines.
- Grout brush: These brushes have long, thin heads designed specifically for grout.
Simple Grout Cleaning Solutions for Kitchen
You do not always need harsh chemicals to get good results. Start mild and work your way up if needed.
Option 1: Baking Soda Paste (The Natural Approach)
Baking soda is a mild abrasive. It lifts dirt without scratching most tiles. This is a great natural grout cleaner for kitchen floors.
- Mix baking soda with water until you have a thick paste.
- Apply the paste directly onto the grout lines.
- Let it sit for 10 to 15 minutes. This lets the paste soak into the grime.
- Scrub the area using your stiff brush. Use firm, short strokes along the grout line.
- Wipe the area clean with a damp cloth.
Option 2: Vinegar Solution (For Mild Discoloration)
White vinegar is acidic. It helps dissolve soap scum and light mineral deposits. Be careful using vinegar on natural stone tiles like marble, as acid can etch them.
- Mix equal parts white vinegar and warm water in a spray bottle.
- Spray the solution onto the grout lines.
- Let it sit for about 5 minutes. Do not let it dry completely.
- Scrub with your brush.
- Rinse the area thoroughly with clean water. This step is vital to remove the vinegar residue.
Deep Cleaning Stubborn Grout Stains
Sometimes, simple pastes are not enough. When the grout looks permanently dark, you need a deep clean kitchen tile grout. This targets years of build-up.
Hydrogen Peroxide and Baking Soda Combo
This mixture creates a powerful, yet safer, bleaching action. It helps lift dark stains and brightens the grout.
Steps for Deep Cleaning:
- Mix 1/2 cup of hydrogen peroxide with 1 cup of baking soda. Add a splash of water if needed to form a paste.
- Apply the paste thickly onto the grout.
- Cover the treated areas with plastic wrap. This keeps the mixture wet and active longer.
- Let it sit for at least 30 minutes, or even an hour for very bad stains.
- Remove the plastic wrap. Scrub hard with a stiff brush.
- Rinse everything well with clean water and dry the floor.
Steam Cleaning for Ultimate Results
A steam cleaner is one of the best grout cleaners for kitchen tile. The high heat and pressure blast away embedded dirt. This often requires no chemicals at all.
- How it works: The steam penetrates the pores of the grout. The heat loosens the dirt bond. You use a small nozzle attachment to direct the steam right onto the grout line.
- Advantage: Steam cleaning is excellent for restoring dirty kitchen floor grout without soaking the grout excessively.
How to Remove Stains from Kitchen Tile Grout
Different stains require different spot treatments. Knowing how to remove stains from kitchen tile grout specifically will save your whole floor from harsh scrubbing.
| Stain Type | Recommended Spot Treatment | Application Notes |
|---|---|---|
| Oil/Grease | Poultice (Clay or Cat Litter mixed with dish soap) | Cover stain, let sit 24 hours, scrape off. |
| Mold/Mildew | Diluted Bleach Solution (1 part bleach to 10 parts water) | Use only on light-colored, non-porous grout. Rinse immediately. |
| Food Dyes (Wine, Juice) | Hydrogen Peroxide Paste (as described above) | Allow long dwell time for the stain to lift. |
| Rust Spots | Commercial Rust Remover for Tile | Follow product instructions strictly. Test in a hidden area first. |
Important Safety Note: Never mix bleach and vinegar. This creates toxic chlorine gas. Stick to one chemical treatment at a time.
Safe Tile and Grout Cleaning Practices
Cleaning kitchen tile floors safely protects your health and the floor material itself. Tiles can crack, and grout can wear down if you are too aggressive.
Protecting Your Tiles
Not all tiles are the same. Ceramic and porcelain tiles are very durable. Natural stone tiles (like slate, travertine, or marble) need extra care.
- Avoid Harsh Acids on Stone: Acidic cleaners (like strong vinegar or many commercial lime removers) will eat away at natural stone surfaces, causing dull spots called “etching.”
- Check Porosity: If you are unsure about your tile type, test any new cleaner on a small, hidden spot first.
Protecting Yourself
When using stronger grout cleaning solutions for kitchen surfaces, protect your body.
- Ventilation: Open windows and turn on the exhaust fan. Good airflow moves fumes away.
- Protective Gear: Always wear rubber gloves to protect your hands. Wear safety glasses to shield your eyes from splashes, especially when using bleach or strong chemicals.
Sealing Your Grout for Future Protection
Once your grout is clean, the best long-term strategy is sealing it. Sealing creates a barrier. This barrier stops dirt and moisture from getting deep into the grout lines again.
Benefits of Grout Sealer
- Makes future cleaning much easier.
- Prevents deep staining.
- Protects against moisture damage and mildew.
How to Apply Grout Sealer
Sealing is a simple step that makes a huge difference in maintaining a clean look.
- Ensure Dryness: The floor must be completely dry after cleaning. Wait at least 24 to 48 hours after a deep clean.
- Choose the Sealer: Buy a good quality, penetrating grout sealer. Look for one designed for kitchen environments if possible.
- Application: Use a small foam brush or an applicator bottle with a fine tip. Apply the sealer directly onto the grout lines, trying to avoid getting too much on the tile surface itself.
- Wipe Excess: After the recommended time (usually 5-15 minutes), wipe any excess sealer off the tile surface immediately with a clean, dry cloth. If sealer dries on the tile, it can leave a hazy film.
- Reapply: Most sealers need reapplication every one to three years, depending on traffic and cleaning frequency.
Advanced Techniques for Restoring Very Old Grout
If you are dealing with very old, dark grout lines, you might feel like you need a miracle. Restoring dirty kitchen floor grout might involve specialized tools.
Using a Rotary Tool (e.g., Dremel)
For grout that is severely cracked or hopelessly stained, some professionals carefully use a rotary tool fitted with a specialized grout removal bit.
- Caution is Key: This method removes the old grout entirely. It is labor-intensive. You must be careful not to damage the edges of the tile.
- Process: After grinding out the old grout, you must clean the area thoroughly and then re-grout the lines before sealing. This is usually a last resort for severe structural failure or deep, irreparable staining.
Chemical Grout Cleaners
There are commercial products specifically labeled as heavy-duty grout cleaners. These often contain stronger acids or specialized surfactants.
- Read Labels: These are powerful. Always follow the safety directions exactly. They are designed to aggressively break down years of embedded soil, making them effective for cleaning dirty kitchen tile floors quickly when elbow grease fails.
Maintaining a Clean Look Between Deep Cleans
The best way to keep your floors clean is consistency. Integrate these habits into your weekly routine.
Mop Bucket Strategy
When mopping, use two buckets. This is key to better results and is part of the best way to clean kitchen tile and grout.
- Bucket 1 (Cleaning Solution): Contains your soapy or vinegar water.
- Bucket 2 (Rinsing Water): Contains plain, clean water.
Dip the mop in Bucket 1, clean a section of the floor, then rinse the dirty mop head thoroughly in Bucket 2 before dipping it back into the cleaning solution. This stops you from reapplying dirty water to your floor.
Immediate Spill Response
Grease spatters from cooking are the number one enemy of clean grout. If you spill something oily:
- Blot up the excess liquid immediately with a paper towel. Do not rub! Rubbing pushes the grease deeper.
- Apply a small amount of dish soap directly to the spot.
- Scrub lightly with a toothbrush.
- Rinse the spot with a damp cloth.
This immediate action prevents the stain from setting into the grout lines, which is essential for cleaning kitchen tile floors safely from major messes.
Summary of Best Practices
Keeping tile and grout clean is a marathon, not a sprint. Use the right tools and methods for the job.
| Cleaning Task | Recommended Frequency | Recommended Solution |
|---|---|---|
| Sweep/Vacuum | Daily | Soft broom or vacuum |
| Light Mopping | Weekly | Mild dish soap and water |
| Grout Spot Clean | As needed | Baking soda paste or vinegar spray |
| Deep Grout Clean | Quarterly or Bi-annually | Hydrogen peroxide paste or Steam Cleaner |
| Grout Sealing | Every 1-3 years | Penetrating Grout Sealer |
By following these detailed steps—from daily dry sweeping to strategic deep cleaning—you can maintain beautiful, bright floors. Effective kitchen tile grout cleaning means consistent, targeted effort using the right grout cleaning solutions for kitchen needs.
Frequently Asked Questions (FAQ)
Q: Can I use bleach on all kitchen tile grout?
A: No. Bleach works well on cementitious grout, especially for mildew. However, avoid using bleach on colored grout as it can lighten the color unevenly. Also, never use bleach on natural stone tiles, only on the grout itself, and rinse quickly.
Q: How long does it take for grout sealer to dry?
A: Drying times vary by product. Most penetrating sealers require about 24 hours before you can walk on the floor normally. Always check the manufacturer’s instructions on the sealer container for the most accurate cure time.
Q: Is it better to use hot water or cold water for mopping?
A: Hot water is generally better for mopping. Heat helps dissolve grease and dirt more effectively than cold water, speeding up the cleaning process for your kitchen tile floor.
Q: What is the best way to clean grout if I have pets?
A: If you have pets, stick to natural grout cleaner for kitchen floors like baking soda and vinegar. Harsh chemicals can irritate your pet’s paws or respiratory system if residue remains. Ensure thorough rinsing after any cleaning.
Q: My grout is crumbling. What should I do?
A: Crumbling grout means it is breaking down structurally. Cleaning will not fix this. You need to remove the old, damaged grout completely and then re-grout the area before sealing it. This is necessary for restoring dirty kitchen floor grout that has failed.