
Can I use dish soap to degrease kitchen cabinets? Yes, dish soap is often the first and easiest solution for kitchen cabinet cleaning as it is designed to break down grease and is generally safe for most cabinet finishes when used correctly.
Greasy kitchen cabinets are a common problem. Cooking creates airborne oils that settle everywhere, especially on the surfaces we touch most often—our cabinets. Getting rid of this sticky film is important not just for looks, but also for hygiene. This guide will walk you through simple, effective ways to remove grease from cabinets, no matter what they are made of. We will look at commercial options and natural degreaser kitchen cabinets solutions. Get ready to deep clean kitchen cabinets and bring back their shine!
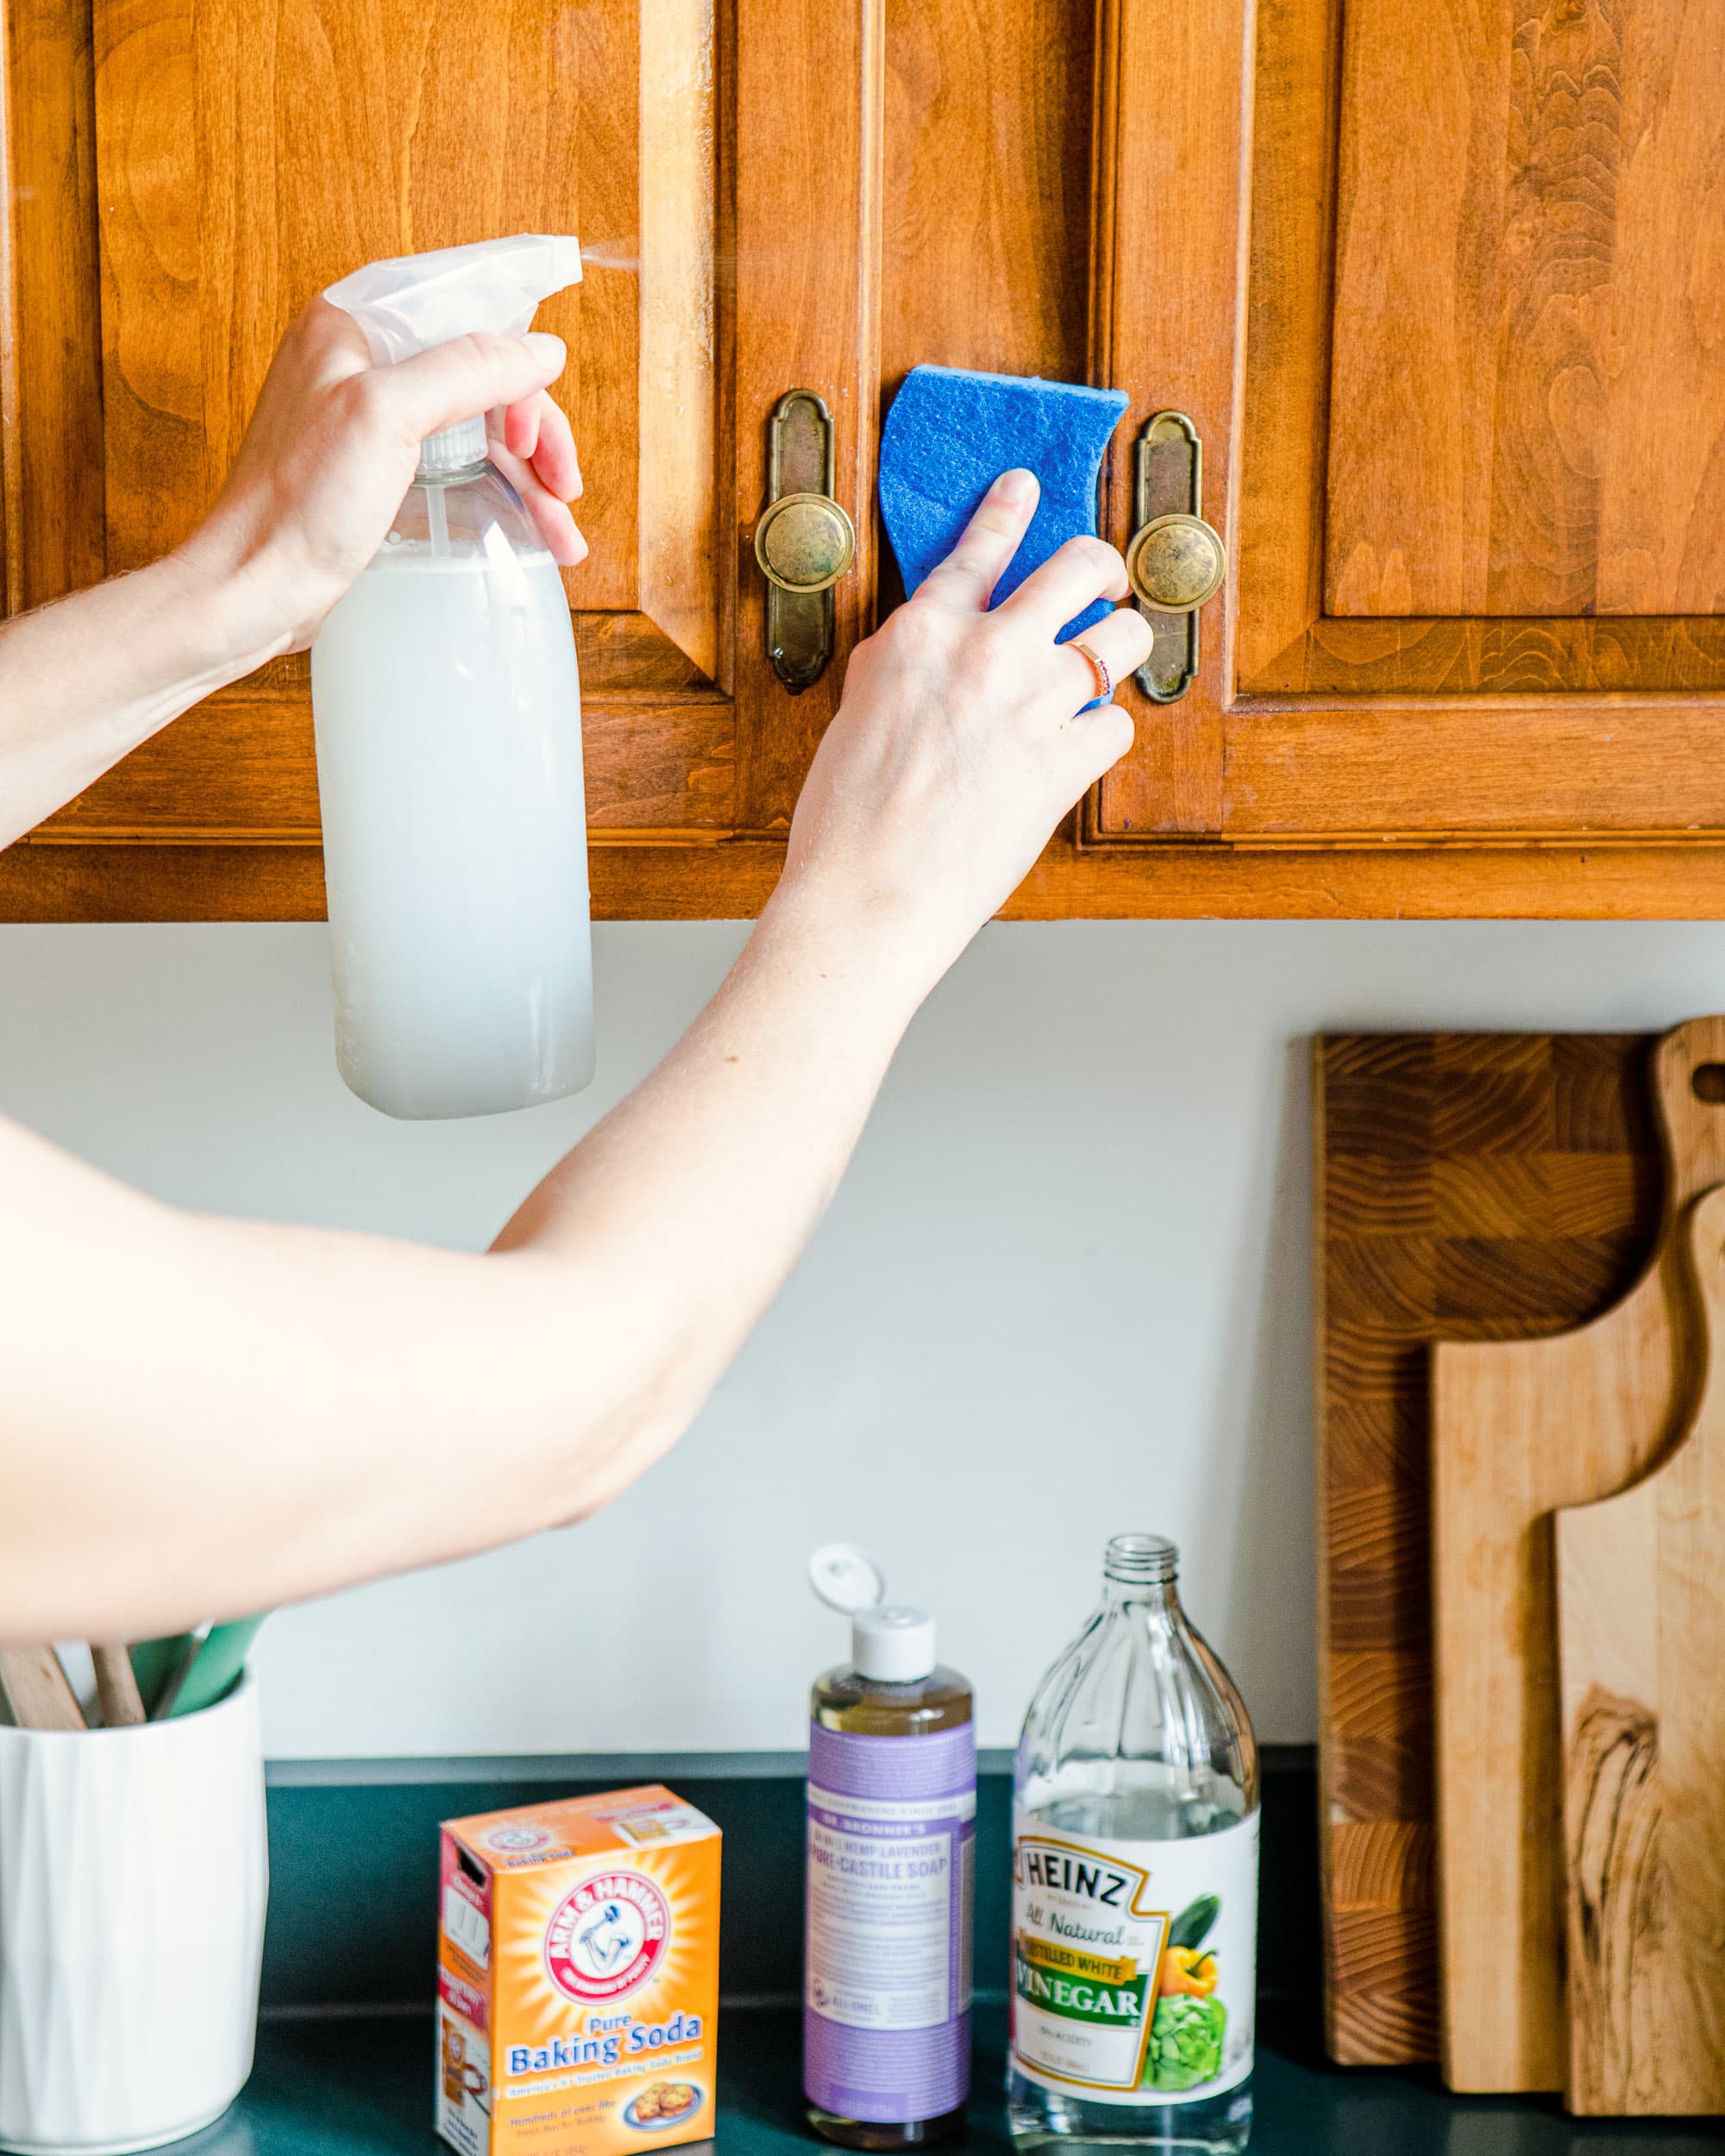
Image Source: cdn.apartmenttherapy.info
Why Kitchen Cabinets Get So Greasy
Kitchen grease builds up slowly. When you fry, sauté, or bake, tiny oil droplets become airborne. These microscopic droplets cool down and stick to surfaces.
Kitchen cabinets act like magnets for this oil. Areas around the stove and range hood get the worst of it. The grease combines with dust and cooking fumes. This mixture hardens over time. This sticky layer is what makes your cabinets look dull or feel tacky to the touch. If you want to keep your kitchen looking new, you must tackle this buildup regularly.
Preparing for Kitchen Cabinet Cleaning
Before you start scrubbing, proper preparation is key. Doing these steps first saves time and protects your cabinets.
Gather Your Supplies
You need the right tools ready. Having everything in one place makes the job smooth.
| Item | Purpose | Notes |
|---|---|---|
| Microfiber Cloths | Wiping and drying | Soft and won’t scratch surfaces. |
| Soft Sponge | Gentle scrubbing | Use the soft side only for most finishes. |
| Bucket or Bowl | Mixing cleaning solutions | Keep one for cleaning, one for rinsing. |
| Old Towels | Protecting the floor | Place them under cabinets you are cleaning. |
| Gloves | Protecting your hands | Keep your skin safe from strong cleaners. |
Test Your Cleaning Solution
Always test your chosen cleaner first. Pick a hidden spot on the cabinet. This might be the inside of a door or a lower panel. Apply a small amount of the cleaner. Wait five minutes. If the finish changes color or texture, do not use that cleaner. This is vital for cleaning wood kitchen cabinets grease safely.
Empty the Area
If possible, remove knobs and pulls. This lets you clean the entire surface evenly. Take everything off the countertops below the area you are working on.
Choosing the Right Kitchen Cabinet Cleaning Solutions
What you use depends on your cabinet material and how bad the grease is. Finding the best degreaser for kitchen cabinets means balancing power with safety.
Simple and Natural Options (Mild to Moderate Grease)
Many effective solutions are already in your pantry. These are great for routine cleaning or when you prefer non-chemical options. These make excellent natural degreaser kitchen cabinets choices.
Dish Soap Mixture
This is the go-to for most situations. Dish soap is made to break down grease.
- Mix one tablespoon of mild dish soap with two cups of warm water.
- Stir gently to create suds.
Vinegar Solution
White vinegar is a mild acid. It helps cut through some grease and disinfects too.
- Mix equal parts white vinegar and warm water (1:1 ratio).
- Use this mixture carefully on wood. Test first!
Baking Soda Paste
Baking soda is a mild abrasive. It is good for spots where grease is really stuck.
- Mix baking soda with just enough water to make a thick paste.
- Apply the paste to the greasy spot. Let it sit for a few minutes.
- Wipe away gently.
Stronger Commercial Degreasers (Heavy Grease Buildup)
When natural options fail, you need something stronger to tackle heavy, baked-on residue. These solutions are for cutting through kitchen grease cabinets that have been neglected.
- All-Purpose Kitchen Degreasers: Many brands offer sprays specifically for kitchens. Look for labels that mention “heavy-duty” or “grease removal.”
- Heavy-Duty Oven Cleaners (Use with Extreme Caution): These are very harsh. Only use them on very tough, non-porous surfaces like laminate or metal cabinet doors. Never let them touch wood or painted surfaces.
Safety Tip: When using strong chemicals, always work in a well-ventilated area. Wear gloves and eye protection.
Step-by-Step Guide to Degreasing Cabinets
This process works well for most cabinet types, including laminate, thermofoil, and painted surfaces. We will address wood later.
Step 1: Dust and Debris Removal
Before applying any liquid, remove the loose dirt.
- Use a dry cloth or a soft brush attachment on a vacuum.
- Wipe down the entire cabinet surface. This stops dry dirt from turning into mud when wet.
Step 2: Apply Your Chosen Kitchen Cabinet Cleaning Solution
Dip your soft sponge or cloth into your chosen solution. Wring it out very well. The cloth should be damp, not dripping wet. Excess water can damage wood finishes.
Step 3: Work in Sections
Do not try to clean the whole kitchen at once. Focus on one cabinet door or drawer front at a time. This helps you see your progress and prevents the cleaner from drying out too fast.
Step 4: Gentle Scrubbing Motion
Wipe the surface using gentle, circular motions. For tough spots, let the cleaner sit for 30 seconds. Then, use light pressure to rub the spot. This is the key to how to clean greasy kitchen cabinets without scratching them.
If you are using the baking soda paste, apply it to the spot, let it sit briefly, and then wipe it off with a damp cloth. Do not scrub hard with the paste.
Step 5: Rinse Thoroughly
This step is crucial. Any soap or cleaner residue left behind will attract new dirt quickly.
- Dip a fresh, clean cloth into plain, warm water. Wring it out until it is nearly dry.
- Wipe down the area you just cleaned. This removes the cleaning agent.
- Repeat this rinsing step until you feel no slickness remains on the surface.
Step 6: Dry Completely
Use a clean, dry microfiber towel to buff the surface dry immediately. Never let cabinet surfaces air dry, especially if they are wood. Moisture left on surfaces can cause swelling or finish damage. A good dry finish restores a nice shine.
Special Care for Different Cabinet Materials
The material of your cabinets dictates which cleaning method is safest and most effective.
Cleaning Laminate and Thermofoil Cabinets
These surfaces are very durable and handle most kitchen cabinet cleaning solutions well.
- Strength: These can usually handle stronger commercial degreasers.
- Method: Use the dish soap mixture or a mild cleaner. If grease is heavy, try a small amount of diluted ammonia, but rinse immediately and thoroughly.
- Caution: Avoid harsh abrasives like steel wool, which can scratch the plastic coating.
Cleaning Painted Kitchen Cabinets
Painted surfaces can be tricky. They range from durable enamel to soft, chalky finishes.
- Strength: Always start with the mildest solution (dish soap and water).
- Method: If the paint seems soft or flakes when touched, use only a slightly damp cloth with mild soap. Avoid vinegar or strong solvents.
- If you are unsure of the paint type: Use a safe kitchen cabinet degreaser like a mild dish soap mixture.
Cleaning Wood Kitchen Cabinets Grease
Wood requires the most care because water and harsh chemicals can warp the wood, dry it out, or strip the protective sealant (varnish or lacquer). Cleaning wood kitchen cabinets grease safely is a top priority.
Using Oil-Based Cleaners for Wood
For sealed wood cabinets, sometimes an oil-based cleaner works wonders. It helps condition the wood while lifting the grease.
- Solution: Mix a small amount of mineral oil (or a wood furniture polish) with a few drops of lemon essential oil.
- Application: Apply this mixture to a cloth, not directly to the wood.
- Action: Rub gently over the greasy area. The oil helps lift the grease without harsh chemicals.
- Wipe Off: Wipe off any excess oil with a clean, dry cloth.
Dealing with Unsealed or Antique Wood
If your wood is unsealed, porous, or very old, water is your enemy.
- Use the baking soda paste sparingly, ensuring minimal moisture.
- Use a solution of rubbing alcohol (isopropyl alcohol) diluted heavily with water (1 part alcohol to 5 parts water) as a last resort for stubborn spots. Rubbing alcohol evaporates very fast, reducing water damage risk.
Table summarizing material care:
| Cabinet Material | Recommended Cleaner (Start Here) | Stronger Option (Test First) | What to AVOID |
|---|---|---|---|
| Laminate/Thermofoil | Dish Soap & Water | Commercial Degreaser | Steel Wool, Acetone |
| Painted (Sealed) | Mild Dish Soap & Water | Diluted Vinegar (Carefully) | Strong Solvents, Heavy Scrubbing |
| Sealed Wood | Mineral Oil/Mild Soap Mix | Lightly Diluted Rubbing Alcohol | Soaking wet rags, Oven Cleaner |
| Unsealed Wood | Dry Wipe, Minimal Moisture | Baking Soda Paste (Very Light Use) | All Water-Based Solutions |
Tackling Heavily Impacted Areas
Some spots need extra attention. These areas are usually right next to the stove burners or the exhaust fan area.
The Hood Filter Area
Grease near the range hood is often thickest because it comes directly from the cooking surface.
- Use a slightly warmer water solution for this area.
- If using a commercial cleaner, allow it to dwell (sit) for a minute longer than usual to start cutting through kitchen grease cabinets before wiping.
Around Drawer Pulls and Handles
Grease builds up right where hands touch the cabinet most.
- Use an old toothbrush dipped in your cleaning solution to gently scrub around hardware.
- Be meticulous in cleaning underneath the lip or edge of drawers and doors, as grease loves to hide there.
Restoring the Shine After a Deep Clean
Once you have completed the deep clean kitchen cabinets process, you might notice the finish looks dull. This is common if strong cleaners were used.
After drying, apply a small amount of wood polish or a protectant designed for your cabinet type. This replenishes moisture (for wood) or adds a protective layer (for laminate/paint), making future cleaning easier.
Maintaining Clean Cabinets to Prevent Buildup
The best way to clean cabinets is to avoid massive buildup in the first place. Regular, light maintenance is easier than a major scrub-down.
Daily Wipe Downs
Keep a dedicated microfiber cloth near the sink. After cooking, quickly wipe down the doors and handles near the stove. This takes 30 seconds and stops the grease from hardening.
Weekly Light Cleaning
Once a week, use a lightly dampened cloth with just water or a tiny bit of dish soap. This removes surface dust and light films before they become an issue.
Quarterly Deep Cleaning
Schedule a full session, like this guide outlines, every three months. This keeps your finishes looking fresh and stops the need for harsh chemical interventions.
Troubleshooting Common Cabinet Cleaning Issues
Even with the best plan, problems can pop up. Here are solutions for common setbacks when trying to remove grease from cabinets.
Issue 1: The Surface Feels Sticky After Cleaning
This usually means you left cleaner residue behind.
Solution: Re-rinse the area thoroughly with a clean, water-dampened cloth. Dry immediately and completely. You might need to do this two or three times for that spot.
Issue 2: The Finish Appears Cloudy or Dull
This often happens on dark wood or thermofoil surfaces. The cleaner might have etched the surface slightly, or residue is acting like a film.
Solution: Polish the area gently with a silicone-free furniture polish made for your cabinet type. If the problem persists, the finish may have been damaged by the product used.
Issue 3: Grease Won’t Budge
If the baked-on oil is stubborn, you need more dwelling time.
Solution: Apply your chosen degreaser (dish soap mix is best to start) and cover the spot with plastic wrap or a damp paper towel. This keeps the cleaner wet and active longer. Let it sit for 10 to 15 minutes. Wipe gently afterward. This gives the solution time to soften the hard grease before you try wiping.
Frequently Asked Questions (FAQ) About Degreasing Cabinets
Q: Can I use Magic Erasers on my kitchen cabinets?
A: Be very cautious. Magic Erasers (melamine foam) act like very fine sandpaper. They work well on tough scuffs but can easily dull or remove the finish on painted, wood, or laminate cabinets if scrubbed hard. Use them only as a last resort on tough spots and rub extremely lightly.
Q: What is the difference between cleaning wood and laminate cabinets?
A: Wood absorbs moisture and can warp or dry out. You must use minimal water and focus on gentle, conditioning cleaners. Laminate is plastic-based, waterproof, and can handle more aggressive scrubbing and stronger chemical kitchen cabinet cleaning solutions.
Q: How often should I deep clean my cabinets?
A: If you cook daily, a deep clean kitchen cabinets session should happen every 3 to 4 months. Light daily wiping should happen almost every day around the stove area.
Q: Is it okay to use rubbing alcohol as a safe kitchen cabinet degreaser?
A: Yes, but always dilute it heavily (no more than 1 part alcohol to 4 parts water). Alcohol is great because it dries fast, which is good for wood. However, high concentrations can soften some plastic or painted finishes, so test first.
Q: I have white cabinets, and they look dingy. What cleans them best?
A: For white surfaces, the soap/water mixture is the safest start. If they are laminate, a very mild solution of hydrogen peroxide mixed with water (1 part peroxide to 3 parts water) can help brighten them, but rinse well.
By following these detailed steps, you can successfully remove grease from cabinets and keep your entire kitchen looking spotless. Remember that consistency is the key to fighting kitchen grease effectively!