
Can I install a new sink without changing my countertop? Yes, you can install a new sink without changing your countertop, but only if the new sink’s dimensions, especially the kitchen sink cutout dimensions, match the existing opening closely. If the size difference is too great, you will need a new countertop or a creative workaround.
Replacing a kitchen sink might seem daunting. It involves precise measurements. Getting these measurements right is key to a smooth job. Wrong measurements lead to leaks, gaps, or a sink that simply won’t fit. This guide will show you how to measure for your new sink step by step. We cover all types, from drop-in to farmhouse styles.
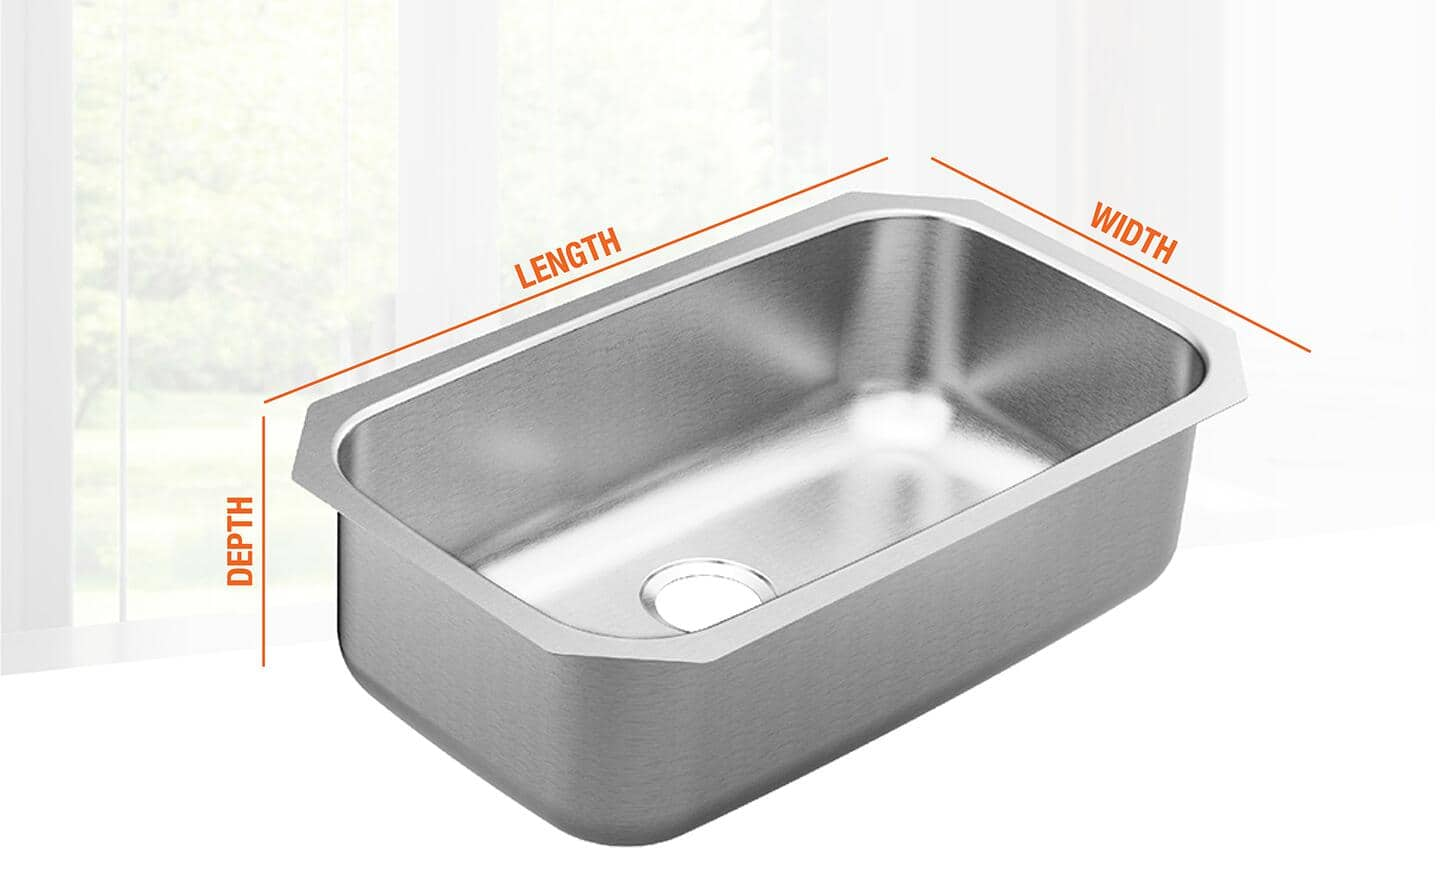
Image Source: dam.thdstatic.com
Why Exact Measurement Matters
A kitchen sink needs a snug fit. This fit keeps water out of the cabinet below. It also keeps the sink steady. A small error can cause big problems later on. You need to measure the old sink, the counter opening, and the cabinet space below.
Tools You Will Need
Gather these simple tools before you start. Good tools make the job easier and more precise.
- Tape measure (a flexible one works best)
- Pencil or marker
- Ruler or straight edge
- Safety glasses
- A helper (for large sinks)
Measuring for a Replacement Sink
If you are replacing an existing sink, you have two main paths. You can try to match the existing sink size, or you can change the countertop opening to fit a new style. Matching the old size is usually simpler.
Measuring the Existing Sink
First, look at the sink you have now. You need to know its style. Is it a top mount sink measurements style (also called drop-in), or an undermount style?
Measuring a Top Mount (Drop-In) Sink
A top mount sink has a rim that rests on top of the counter.
- Measure the Overall Width and Length: Measure from the very edge of the rim on one side to the very edge of the rim on the opposite side. Do this for both the width and the length. Write these down.
- Measure the Basin: Measure the inside of the sink bowls. This helps you compare the size of the old bowl to a new one. Pay close attention to single bowl sink measurements if you have one large basin. If you have two, note the double bowl sink dimensions.
- Measure the Depth: This is crucial for clearance under the counter. Measure from the very top rim down to the bottom of the sink basin. This is your sink basin depth guide.
Measuring an Undermount Sink
An undermount sink is attached below the counter. The counter edge is exposed.
- Measure the Sink Lip: Measure the total size of the sink, including the flange (the raised lip that mounts to the counter).
- Measure the Cutout: This is the most important part for an undermount. Measure the hole in the countertop itself. Measure from one cut edge to the opposite cut edge, both ways. This is the kitchen sink cutout dimensions.
- Note the Faucet Location: If you are keeping the existing countertop, check where the faucet holes are drilled. You need to know the faucet hole drilling location relative to the front edge of the counter.
Measuring the Cabinet Base
The sink must fit inside the cabinet box under the counter. If the cabinet is too small, the new sink will not go in, even if it fits the hole.
- Measure Cabinet Width: Open the cabinet doors. Measure the width from the inside wall on the left to the inside wall on the right.
- Measure Cabinet Depth: Measure from the back wall of the cabinet to the front edge where the doors are.
- Check for Obstructions: Look for things in the way, like plumbing pipes or garbage disposals already installed. A large single bowl sink measurements might require a larger cabinet base than a comparable double bowl sink measurements sink. Make sure the new sink bowl dimensions will clear these items.
Measuring for a Brand New Installation
If you are installing a sink in a new countertop or doing a full remodel, you measure for the hole based on the sink you plan to buy.
Step 1: Select Your Sink Style and Size
First, choose the sink you want. This dictates all other measurements.
- Top Mount Sinks: These are forgiving. The cutout is usually slightly smaller than the sink rim.
- Undermount Sinks: These require the cutout to be smaller than the sink bowl but larger than the sink’s mounting flange.
Step 2: Determining Kitchen Sink Cutout Dimensions
This step depends heavily on the sink type. Always use the template provided by the sink manufacturer. Never rely only on the sink’s overall size to guess the cutout size.
For Top Mount Sinks
The manufacturer provides a template.
- Trace the Template: Place the paper template (usually included in the box) onto the countertop where the sink will sit.
- Mark the Cut Line: Draw along the inside line of the template. This inside line marks where the counter material needs to be removed. This line accounts for the rim holding the sink up.
For Undermount Sinks
This is more precise. The cutout must fit the sink basin but leave space for the mounting clips.
- Locate the Template: The manufacturer supplies a cutout template. This template is usually smaller than the sink itself.
- Positioning: Place the template in the desired location. Make sure it is centered side-to-side and front-to-back.
- Check Clearance: Ensure the template is far enough away from the back wall to allow for plumbing connections and the faucet deck.
- Mark the Cut: Trace the template line. This line represents the hole where the stone or solid surface will be removed. This results in the undermount sink template size being the final opening size.
Step 3: Confirming Undermount Sink Clip Placement
When installing an undermount sink, you use clips to hold it tight against the bottom of the counter.
- You must ensure that where the clips sit on the sink flange, there is enough space between the sink edge and the counter opening.
- If the cutout is too small, you cannot reach around the sink edge to tighten the kitchen sink clip placement hardware.
Step 4: Assessing Sink Basin Depth Guide
Deciding how deep your sink should be involves looking at both the sink itself and the cabinet below.
| Typical Sink Depth | Use Case | Cabinet Clearance Consideration |
|---|---|---|
| 6 to 8 inches | Shallow use, RVs, or tight cabinets | Good clearance for plumbing. |
| 9 to 10 inches | Standard home use | Most common choice. Requires good clearance. |
| 10 inches + | Deep sinks for large pots | Sink basin depth guide needs careful checking against garbage disposals or drain traps. |
If you choose a very deep sink, check the sink installation rough opening size requirements for the cabinet. The bottom of the sink should not hit the floor or any supports inside the cabinet.
Special Considerations for Different Sink Styles
Different sink types have different measurement needs.
Measuring for Farmhouse Sinks (Apron Front)
Farmhouse sinks are large and heavy. They require support and specific countertop cuts.
- Cabinet Modification: You often need to remove the front cabinet face frame. The cabinet base must be reinforced, as the sink supports most of its own weight.
- Apron Measurement: Measure the required cutout for the front apron. This usually means measuring the sink apron height and making sure the counter will end right at the top edge of the apron.
- Farmhouse Sink Overhang Requirements: The apron needs to sit proud (stick out slightly) past the cabinet base. Check the manufacturer’s guide for the precise farmhouse sink overhang requirements. This is usually about 1 inch, but it must be consistent across the entire front.
- Side and Back Cutouts: Measure the side and back openings needed for the countertop sections that will meet the sink ends and back. These must be precise to avoid gaps where water can seep in.
Measuring for Double Bowl Sinks
Double bowl sink dimensions can vary widely in how they divide the space.
- Symmetry: Are the bowls equal (50/50 split)? Or is one large and one small (e.g., 60/40 split)?
- Divider Size: Measure the width of the divider between the bowls. This measurement is already set by the sink itself, but you must confirm the overall length and width still fit the cabinet.
Measuring for Single Bowl Sinks
Single bowl sink measurements are simpler in terms of internal division, but the overall size often dictates a larger cutout. Many modern deep sinks are single bowls. Ensure your cabinet can handle the width and depth required for large pots and pans.
Finalizing Measurements and Confirming Fit
Once you have measured the sink and the space, you must double-check everything before cutting.
Cross-Checking Measurements
Use this simple check system:
| Measurement Point | Sink Measurement | Countertop Cutout Measurement | Cabinet Size Measurement |
|---|---|---|---|
| Length (L) | Total Sink L | Inner Cutout L (for undermount) | Interior Cabinet L |
| Width (W) | Total Sink W | Inner Cutout W (for undermount) | Interior Cabinet W |
| Depth (D) | Sink Depth | N/A (Check for clearance) | Clearance below sink |
- Top Mount: The cutout must be slightly smaller than the overall sink length/width to allow the rim to rest on the counter.
- Undermount: The cutout must be smaller than the overall sink size but large enough to allow kitchen sink clip placement hardware to attach securely.
Checking Faucet and Accessory Holes
If you are using a sink that comes with pre-drilled holes (common for top mount sinks), confirm the faucet hole drilling location matches where you want your faucet to be positioned relative to the sink basin.
If you are using a countertop with existing holes, ensure the new sink’s required edge distance aligns perfectly with those holes. If the new sink is an undermount style with no deck, you must drill new holes in the counter for the faucet and soap dispenser. Measure carefully from the edge of the countertop cutout to the center of where you want the faucet positioned.
The Role of Rough Opening Size
The sink installation rough opening size refers to the initial hole cut into the sub-countertop or the space left open in the base cabinet structure.
For DIYers, it is safer to cut the hole slightly smaller than needed and then enlarge it. Stone and solid surface countertops are hard to patch if you cut too much away.
- For Stone/Solid Surface: Cut 1/8 inch smaller than the final template line. You can use a grinder or specialized bit to slowly widen the hole until the sink fits perfectly.
- For Laminate/Wood: Cut exactly to the line or slightly larger (1/16 inch). Since these materials are easier to trim, a slightly larger cut is sometimes preferred for a top mount sink.
Securing the Sink: Clips and Sealants
Accurate measurement ensures that the securing hardware works as intended.
Sink Clips and Mounting Hardware
Most sinks use clamps or clips tightened from underneath.
- Access: Ensure you have enough room in the cabinet to lie down and reach up to tighten the nuts onto the screws of the mounting clips. Deep sinks reduce this access space.
- Even Tension: The clips must apply even pressure around the entire rim (for top mount) or flange (for undermount). Incorrect kitchen sink clip placement can lead to a rocking sink or uneven sealant application.
Sealant Application
After measuring and fitting the sink, you apply sealant (usually silicone caulk).
- A gap of 1/16 inch or less between the sink rim and the counter is ideal.
- If your measurements resulted in a 1/4-inch gap, the sink might look poor, and the sealant bead will be too thick, leading to potential early failure. This is why accurate measurement is essential to avoid large gaps.
FAQ Section
What is the standard size for a kitchen sink cutout?
There is no single standard size because sinks vary greatly. However, for a typical 33-inch double bowl sink dimensions drop-in unit, the cutout is often around 32.5 inches by 21.5 inches. Always follow the template provided with your specific sink model.
How much smaller should the sink cutout be than the sink itself?
For a top mount sink, the cutout should be about 1/2 inch smaller in both length and width than the overall sink rim dimensions. This allows the rim to rest securely on the countertop. For an undermount sink, the cutout is based on the template, ensuring it’s larger than the basin but smaller than the rim flange.
Does sink basin depth guide affect installation?
Yes. The sink basin depth guide is critical for clearance. You must ensure the bottom of the sink does not interfere with the plumbing rough-in, the garbage disposal, or the bottom of the cabinet box. Deep sinks (10 inches plus) often require checking the sink installation rough opening size compatibility with your existing cabinet structure.
What is the correct faucet hole drilling location?
This depends on the sink style. If the sink has a pre-drilled deck, the location is fixed. If you are drilling the countertop, the typical placement centers the faucet over the divider or the center of a single bowl. Measure from the back edge of the counter cutout to the center of the hole, usually between 2 and 3 inches back from the front edge of the counter.
How do I ensure proper farmhouse sink overhang requirements?
For a farmhouse sink overhang requirements check, measure the distance the apron of the sink sticks out past the cabinet support structure. Typically, this is 1 inch, but you must check the manufacturer’s specification sheet. If installing in stone, ensure the countertop cut precisely meets the top edge of the apron for a clean line.