
Can I paint wooden kitchen cupboards? Yes, absolutely! Painting wooden kitchen cupboards is a fantastic way to achieve a complete DIY cabinet makeover without the huge cost of replacement. This guide will walk you through every step needed for successful refinishing kitchen cabinets, ensuring you get a smooth, long-lasting finish. Even if you are painting laminate cabinets, many of these preparatory steps still apply, though specific primers may differ.
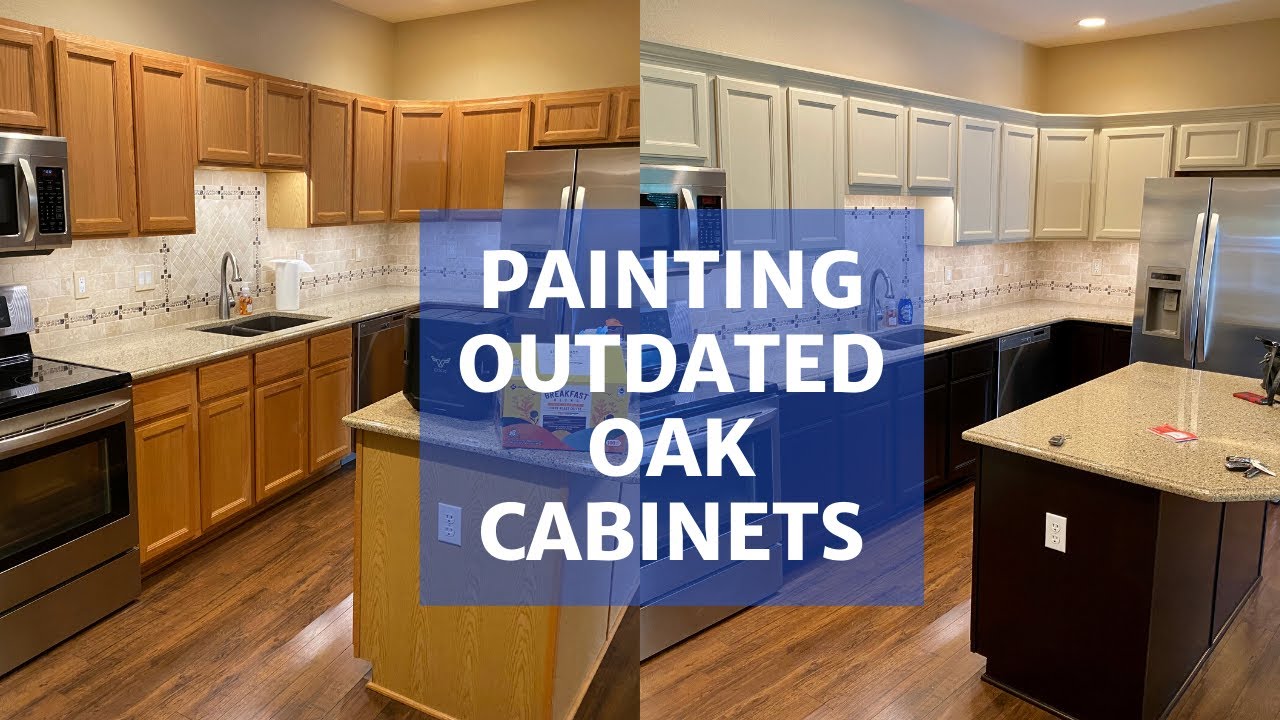
Image Source: i.ytimg.com
Why Paint Your Kitchen Cabinets?
Painting your cabinets offers huge benefits for your kitchen. It is budget-friendly, lets you pick any color, and dramatically improves the look of your space. It is a top choice for kitchen cabinet upgrade ideas. Before we start, know that success relies heavily on good prep work.
Deciphering the Best Paint Choices
Choosing the right paint is key to a durable paint finish for cabinets. Not all paints work well on surfaces that see daily wear and tear, like kitchen cabinets.
High-Quality Paints for Cabinetry
For the best results, avoid standard wall paint. Kitchen cabinets need tough paint that resists grease, moisture, and scrubbing.
| Paint Type | Pros | Cons | Best For |
|---|---|---|---|
| Oil-Based Alkyd | Very hard, smooth finish. | Strong fumes, slow drying, yellows over time. | Cabinets needing extreme durability. |
| Water-Based Acrylic/Latex | Low odor, quick dry time, easy cleanup. | Needs a high-quality formula for hardness. | Most modern DIY projects. |
| Urethane-Modified Acrylics | Combines durability of oil with easy cleanup of water-based. | Can be more expensive. | Excellent overall choice. |
If you opt for chalk paint kitchen cabinets, remember that chalk paint often needs a very strong topcoat (like a polyurethane sealer) to handle kitchen use.
Specialty Paints for Difficult Surfaces
If you are tackling older cabinets or specifically painting laminate cabinets, look for primers and paints labeled as bonding primers or paints specifically for slick surfaces. These grab hold better.
Gathering Your Tools and Supplies
Having everything ready prevents mid-project delays. Good tools make the job easier and improve the final look.
Essential Materials List
- Screwdriver set (for removing hardware)
- Mild degreaser or TSP substitute
- Fine-grit sanding sponges (180, 220 grit)
- Tack cloths
- Painter’s tape and plastic sheeting
- Wood filler or Bondo (for repairs)
- High-quality bonding primer (crucial step!)
- Best paint for kitchen cabinets (Urethane-modified acrylic recommended)
- High-density foam roller covers (3/8 inch nap or less)
- Angled sash brush (2-inch)
- Spray gun (optional, for spray painting kitchen cabinets)
- Top coat/Sealer (polyurethane or polycrylic)
The Core of Success: Preparing Cabinets for Paint
The mantra for cabinet painting is: Preparation is 80% of the job. Poor prep leads to peeling paint within months. This section details preparing cabinets for paint.
Step 1: Detaching and Disassembling
Take everything out of the cabinets. Remove all doors, drawers, and hardware.
- Label Everything: Use masking tape and a marker to label the back of every door and drawer. Note where they belong (e.g., “Upper Left Door 1”). This saves major headaches later.
- Remove Hardware: Keep all screws and handles in labeled plastic bags.
Step 2: Deep Cleaning (Degreasing)
Kitchen cabinets collect kitchen grease. Paint will not stick well to grease residue.
- Use a Degreaser: Mix a strong solution of TSP substitute (or a dedicated degreaser) with warm water.
- Scrub Thoroughly: Wipe down every surface—front, back, and edges—of the doors and frames. You should feel no slickness when you run your hand over the surface afterward.
- Rinse Well: Wipe all surfaces down again with a cloth dipped in clean water to remove any soap residue. Let them dry completely.
Step 3: Repairing Imperfections
Fix any chips, dents, or holes before painting.
- For small holes, use wood filler.
- For larger gaps or deep scratches, consider using a two-part epoxy filler or Bondo, as these set very hard.
- Once dry, sand the repaired spots smooth with 180-grit sandpaper.
Step 4: Sanding for Adhesion
Sanding is non-negotiable. You are not trying to remove all the old finish. You are only “scuffing” the surface to give the primer something to grab onto.
- Choose Your Grit: Use 180-grit sandpaper or a sanding sponge. If the old finish is very glossy, you might start with 150-grit, but avoid going too coarse.
- Sand All Surfaces: Sand every surface that will be painted—doors, drawer fronts, and the cabinet frames. Use firm but gentle pressure.
- Final Dust Removal: This is vital. Use a vacuum cleaner with a brush attachment first. Then, wipe everything down thoroughly with a tack cloth or a microfiber cloth slightly dampened with mineral spirits (if using oil-based primer) or just water (if using water-based primer).
Step 5: Taping and Protecting
Protect the areas you do not want painted.
- Mask Off: Use quality painter’s tape to mask off the inside of the cabinets, countertops, walls, and any hardware openings you aren’t painting over.
- Ventilation: Set up fans to draw air out of the room or work outside if possible. Good airflow is crucial for drying and safety.
Applying Primer: The Foundation of Durability
Primer seals the wood, blocks stains, and, most importantly, ensures the topcoat adheres permanently. Do not skip this step, especially when refinishing kitchen cabinets.
Selecting the Right Primer
- For Bare Wood: Use a stain-blocking primer (like an oil-based or shellac-based primer) to stop tannins from bleeding through light-colored paint.
- For Glossy or Laminate Surfaces: You need a dedicated bonding primer. These are engineered to stick to slick surfaces.
Primer Application
Apply primer in thin, even coats.
- First Coat: Use an angled brush to “cut in” the edges and corners of the cabinet boxes. Use a small foam roller for the large, flat areas of the doors and frames. Roll in the same direction you plan to paint later.
- Drying: Let the first coat dry completely based on the manufacturer’s instructions.
- Light Sanding: Once dry, lightly scuff the primer coat with a 220-grit sanding sponge. This knocks down any tiny bumps or dust nibs trapped in the primer. Wipe clean with a tack cloth.
- Second Coat (Optional but Recommended): Apply a second thin coat of primer for the best adhesion and coverage, especially if the original wood color is very dark. Sand lightly again after this coat dries.
Mastering the Painting Techniques
Now for the fun part—applying the color! Your technique will determine how professional the final finish looks.
Hand Painting vs. Spray Painting Kitchen Cabinets
Both methods work, but they offer different results.
- Hand Painting: Requires more labor but gives you total control. It’s easier for beginners. You rely heavily on a high-quality brush and roller combo to minimize brush strokes and roller texture.
- Spray Painting Kitchen Cabinets: If you own or rent a paint sprayer (HVLP systems are great for this), spraying gives the smoothest, factory-like finish. It requires much more setup (masking and spraying booths) but often yields superior results if done correctly.
Cabinet Painting Techniques (Brushing and Rolling)
If you are hand painting, follow these steps for a smooth finish:
- Start with the Edges: Use your angled brush to paint all the narrow edges, grooves, and recessed areas first. Work slowly.
- Rolling the Flats: Immediately after brushing the edges surrounding a flat panel, switch to the foam roller. Dip the roller lightly—overloading causes drips. Apply paint in long, consistent, overlapping strokes.
- The “Wet Edge”: Always try to keep a “wet edge.” This means overlapping the fresh paint with the section you just rolled before it starts to dry. This blends the paint together and hides roller marks.
- Two Coats Minimum: Apply the first coat thinly. Let it dry completely (this can take 4-12 hours depending on humidity and paint type). Sand lightly with 220-grit paper between coats. Apply the second coat just like the first.
If Spray Painting
If you choose spray painting kitchen cabinets, thin your paint according to the sprayer manufacturer’s directions. Use light, sweeping passes, keeping the gun perpendicular (straight up and down) to the surface. Overlap each pass slightly. Do not linger in one spot, or the paint will run.
Curing and Finishing for Longevity
The paint might feel dry in a few hours, but it is not fully cured (hardened). This curing time is when you achieve that durable paint finish for cabinets.
Top Coat Application
For maximum protection against spills and scrubbing, you must use a topcoat, especially over lighter colors or if you used chalk paint kitchen cabinets.
- Wait for Full Dry Time: Wait at least 24 hours (or longer for oil-based paint) after the final color coat before applying the sealer.
- Choose Your Sealer: Polycrylic (water-based) is usually clear and dries very hard. Polyurethane (oil-based) is also tough but may slightly amber the color over time.
- Apply Thinly: Apply the topcoat just like the paint—thin coats are better than thick ones. Use a clean foam roller or sprayer. Two coats of sealer are standard for high-traffic areas like kitchens.
Curing Time
This is the hardest part of the DIY cabinet makeover: waiting.
- Dry to Touch: A few hours.
- Recoat Time: As per can instructions (usually 4-12 hours).
- Ready for Light Use: 3–7 days.
- Fully Cured (Maximum Hardness): Up to 30 days.
Wait at least one week before putting hardware back on and two weeks before heavy cleaning or putting items back inside the cabinets. Treat them gently during this first month.
Working with Different Cabinet Materials
While this guide focuses on wood, many people wonder about other common materials.
Painting MDF Cabinets
Medium-Density Fiberboard (MDF) is smooth and uniform. It absorbs moisture easily, so it is vital to use a high-quality, moisture-resistant primer. Sanding is less aggressive than with solid wood, as you don’t want to damage the fibers.
Painting Laminate Cabinets
Painting laminate cabinets requires special attention. Laminate is slick plastic. You must skip heavy sanding and focus entirely on chemical cleaning and using a dedicated bonding primer designed specifically for slick, non-porous surfaces. If the primer doesn’t bond, the paint will peel off the laminate like a sticker.
Putting It All Back Together
Once the paint and topcoat are fully cured, it is time to reassemble.
- Reinstall Hardware: Attach the handles and knobs back onto the doors and drawer fronts.
- Rehang Doors: Carefully align and screw the doors back onto the cabinet frames. Adjust the hinges until all doors line up perfectly. This step often requires patience!
- Clean Up: Remove all tape and plastic sheeting. Clean your brushes and rollers immediately.
This final step reveals your amazing kitchen cabinet upgrade ideas brought to life!
Frequently Asked Questions (FAQ)
Q: How long does painting kitchen cabinets typically take?
A: For an average-sized kitchen (about 20 doors and drawer fronts), the process usually spans 4 to 7 days. This accounts for drying and curing times between coats of primer, paint, and sealer. Active labor time is about 15–20 hours spread over those days.
Q: Can I use a small brush or roller intended for trim to paint the cabinets?
A: It is best to use the right tools. For large, flat surfaces, use a high-density, 3/8-inch nap foam roller cover. For detailed work, use a high-quality angled sash brush designed for smooth finishes. Using trim tools on large panels will result in visible texture or brush marks.
Q: What happens if I don’t sand the cabinets before painting?
A: If you skip sanding, the paint will not adhere properly to the slick, old finish. When the cabinets encounter heat, moisture, or cleaning, the paint will likely chip, flake, or peel off quickly. Proper sanding creates “tooth” for the primer to grip.
Q: Is painting MDF cabinets easier than solid wood?
A: MDF is often easier because it is perfectly flat, requiring less patching. However, MDF edges can fray easily if over-sanded, and it swells easily if it gets too wet. Always use a high-quality, moisture-resistant primer on MDF.