
Can I replace my kitchen backsplash myself? Yes, you absolutely can replace your kitchen backsplash yourself. Many homeowners find this a rewarding and manageable DIY project. This guide will walk you through every step of replacing your kitchen backsplash, from taking down the old one to setting the final grout lines.
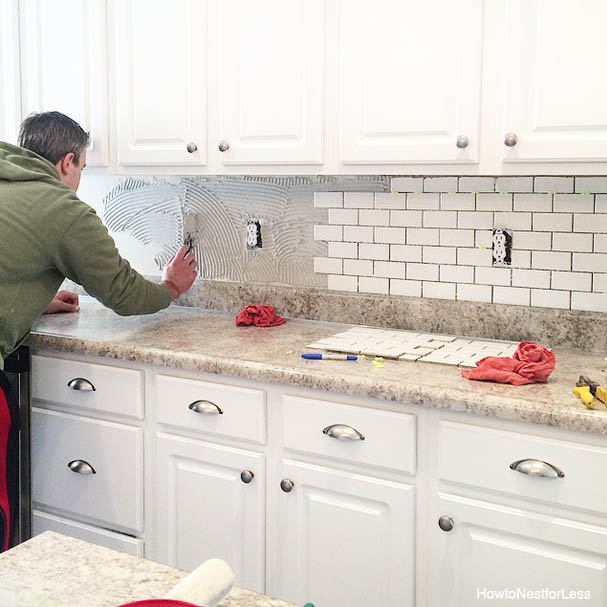
Image Source: howtonestforless.com
Deciphering Your Project: Planning the New Look
Choosing a new backsplash sets the tone for your whole kitchen. There are many types of kitchen backsplashes available today. Your choice affects the tools you need, the prep work, and the overall cost.
Examining Different Backsplash Options
When picking a new material, think about ease of cleaning, budget, and style.
| Backsplash Type | Durability | Installation Difficulty | Typical Cost (per sq. ft.) |
|---|---|---|---|
| Ceramic/Porcelain Tile | Very High | Medium | \$3 – \$20 |
| Glass Tile | High | Medium-High | \$10 – \$35 |
| Natural Stone (Marble, Slate) | Medium | High | \$15 – \$50+ |
| Peel-and-Stick Vinyl | Low | Very Easy | \$2 – \$10 |
| Metal Panels | High | Medium | \$15 – \$40 |
If you choose tile, remember that a subway tile installation is classic and popular. It tends to be easier for beginners than intricate mosaics.
Gathering Your Tools and Supplies
A successful project starts with good preparation. Make a list of everything you need before you start. You want to avoid multiple trips to the hardware store mid-job.
You will need basic hand tools and safety gear.
- Safety glasses and gloves
- Putty knife and pry bar
- Hammer and chisel (for removal)
- Utility knife
- Tape measure and level
- Tile cutter or wet saw (for cutting backsplash tiles)
- Trowel (notched for adhesive)
- Grout float
- Sponges and buckets
- Best backsplash adhesive (thin-set mortar or tile mastic)
- Grout and sealer
Step 1: Removing Old Backsplash Safely
This is often the messiest part of the job. Properly removing old backsplash prevents damage to your drywall or cabinets.
Protecting Your Workspace
Cover your counters completely. Use heavy-duty plastic sheeting or old drop cloths. Tape the edges down securely. Turn off power to any outlets or switches in the backsplash area. Remove switch plates and outlet covers.
Taking Down the Old Material
If your old backsplash is tile or stone, you need to break it up gently.
- Locate the Edges: Start at a corner or an edge where the backsplash meets the counter or cabinet.
- Pry Gently: Insert a stiff putty knife or chisel into a gap between the wall and the tile. Tap the back of the tool lightly with a hammer. Work slowly around the area.
- Use Force Carefully: For tough spots, use a small pry bar. Apply steady pressure, not sudden jerks. You want to pull the tile off the wall, not chunks of the drywall behind it.
- Address Adhesive: Once the tiles are off, you will likely have old adhesive residue. Use a wide putty knife or an electric sander with fine grit to scrape this off. Remove as much as possible for a smooth surface.
Step 2: Preparing Walls for Backsplash
The success of your kitchen tile installation depends heavily on the wall surface. Rough or uneven walls lead to crooked tiles and weak adhesion.
Inspecting and Repairing the Surface
Check the wall for any damage caused during removal. Small holes from anchors or screws can be filled with patching compound. Let the compound dry fully. Sand the patched areas until they are smooth and flush with the rest of the wall.
Cleaning and Priming
The wall must be clean, dry, and dust-free. Wipe the area down with a damp cloth to remove all dust from sanding or demolition. If you removed old tile that was glossy, you might need a degreaser.
- Use a Primer: Apply a coat of quality drywall primer or a bonding primer, especially if you are working over old paint or patched areas. This ensures the best backsplash adhesive bonds strongly to the wall. Let the primer dry completely according to the manufacturer’s instructions.
Establishing a Starting Point
This is crucial for making sure your tiles line up straight. If you start too high or too low, the unevenness will show at the bottom near the counter.
- Find the Center: Measure the horizontal distance across the whole backsplash area. Mark the exact center point.
- Establish the Baseline: Find the lowest point where the backsplash will sit—usually just above the countertop or a window sill. Use a long, straight level to draw a perfectly horizontal line across the entire wall, starting from this lowest point. This line is where the bottom edge of your first row of tiles will rest.
- Check Vertical Lines: Use a plumb line or a laser level to draw a vertical line through your center point. This helps you center the pattern, especially if you have a specific tile layout like a centered accent piece.
Step 3: Laying Tiles – The DIY Backsplash Tutorial
This phase brings your vision to life. Take your time and work in small sections.
Choosing Your Adhesive
For most tile work, you need a thin-set mortar. If you are installing small, lightweight tiles (like glass mosaics), a premixed tile mastic might work. Always check the requirements for your specific tile type.
- For standard ceramic or porcelain tiles, a quality unmodified thin-set mortar is the best backsplash adhesive. It dries hard and resists moisture well.
Applying the Adhesive
Do not spread adhesive over the entire wall at once. Work in small sections, about 2×2 feet. This stops the adhesive from drying out before you place the tiles.
- Select the Right Trowel: The size of the notch on your trowel is important. For standard tiles, use a 1/4-inch square-notched trowel.
- Spread Evenly: Hold the trowel at a 45-degree angle. Spread the adhesive firmly, creating uniform ridges. The goal is to have full coverage when you press the tile in.
- Back-Butter (Optional but Recommended): For heavy tiles like natural stone, spread a thin layer of adhesive directly onto the back of the tile as well. This ensures 100% contact, preventing hollow spots that can lead to cracking later.
Setting the Tiles
Start laying tiles from your established baseline.
- Place the First Row: Set the first tile onto the adhesive along your baseline. Press it firmly with a slight twisting motion to seat it well.
- Use Spacers: Insert tile spacers between each tile immediately. Spacers keep the gaps (grout lines) consistent. For a precise subway tile installation, maintaining uniform joints is key to a professional look.
- Check Alignment Often: After placing every few tiles, use your level to check that they are straight both vertically and horizontally. Adjust them now by gently tapping them with a rubber mallet if needed.
Cutting Backsplash Tiles
You will need to make cuts around outlets, corners, and cabinet edges. This is where tile cutters shine.
- For Straight Cuts: A manual snap cutter is perfect for ceramic or porcelain tiles. Mark the cut line clearly. Score the tile deeply along the line with the cutter’s wheel. Then, apply firm, quick pressure on the lever to snap the tile cleanly.
- For Curves or Complex Shapes: If you need to cut around an outlet box or make curved cuts, you will need a wet saw with a diamond blade or a tile nibbler. Cutting backsplash tiles with a wet saw is the cleanest way to handle very hard materials like glass or dense porcelain. Always wear eye protection when using power tools.
Let the adhesive cure completely. This usually takes 24 to 48 hours. Check the adhesive package directions. Do not proceed until the tiles are firmly set.
Step 4: Grouting Kitchen Backsplash
Grouting kitchen backsplash fills the gaps, locks the tiles in place, and gives the final finished look.
Removing Spacers and Cleaning
Once the adhesive is dry, pull out all the plastic spacers. Wipe down the tile faces gently to remove any dried adhesive or mortar crumbs that might interfere with the grout.
Mixing the Grout
Grout comes as a dry powder you mix with water or as a pre-mixed tub.
- Powdered Grout: Mix the powder with clean water according to the instructions. Mix slowly to avoid air bubbles. The final consistency should be like thick peanut butter—it should hold its shape on the trowel but still spread easily. Let the mixture “slake” (rest) for about 10 minutes before mixing it one last time.
Applying the Grout
Work in small sections again. Grout dries faster than thin-set, especially in warm kitchens.
- Load the Float: Scoop some grout onto the rubber grout float.
- Force the Grout: Hold the float at a 45-degree angle to the wall. Press the grout firmly into the joints, moving diagonally across the tile pattern. This forces the grout deep into the gaps.
- Remove Excess: Once the joint is filled, hold the float nearly perpendicular (90 degrees) to the wall. Scrape off the heavy excess grout, moving diagonally again. Try not to pull grout out of the joints you just filled.
Cleaning Up the Haze (Sponging)
This step requires patience. You must wait until the grout has set slightly—it should look dull, not shiny wet. This typically takes 15 to 30 minutes.
- First Wipe: Use a large, damp (not soaking wet) grout sponge. Gently wipe the surface of the tiles in a circular motion. Rinse the sponge often in clean water. This removes the bulk of the surface grout.
- Second Wipe: Let the grout firm up for another hour. Wipe again with a barely damp sponge to refine the lines and remove the thin grout haze left on the tile face. Change your rinse water frequently! Dirty water leaves a stubborn white film.
- Final Polish: Once fully dry (several hours later), you might notice a light, powdery haze (grout haze). Buff this off with a soft, dry cloth or cheesecloth.
Step 5: Sealing the Backsplash
Sealing kitchen backsplash materials protects them from stains and moisture, especially in high-use areas like behind the stove or sink.
When to Seal
You must wait for the grout to cure completely before sealing. This varies, but 48 to 72 hours is a safe bet for cementitious grout. Natural stone tiles often require sealing before grouting, too. Check your specific grout and tile instructions.
Applying the Sealer
Most sealers are clear liquid applied with a small foam brush or cloth.
- Apply to Grout: Brush the sealer directly onto the grout lines. Try to avoid pooling it on the tile face if possible (though many high-quality sealers are safe for both).
- Apply to Porous Tile: If you used unglazed tile or natural stone, apply the sealer to the tile surface as well.
- Wipe Excess: After the recommended dwell time (usually 5 to 15 minutes), wipe off any excess sealer from the tile surface with a clean rag.
- Second Coat (If Needed): Many areas benefit from a second coat applied after the first one dries.
Sealing should be done regularly—usually every 1 to 3 years—to maintain protection.
Advanced Considerations for Tile Installation
While this DIY backsplash tutorial covers the basics, certain materials require extra attention.
Specifics of Subway Tile Installation
A subway tile installation often uses a running bond (or offset) pattern, mimicking the look of traditional subway lines.
- Calculating the Offset: For standard 3×6 inch subway tiles, the next row starts halfway down the tile below it (a 50% offset).
- The Border Effect: Pay close attention to the edges. If the last tile at the edge is too thin (less than half a tile wide), adjust your entire layout slightly so that you start a bit further in from the cabinet edge. This ensures balanced cuts on both sides.
Working with Backsplash Moldings and Trim
Finishing the edges correctly makes the whole job look professional.
- Bullnose Tiles: If your tiles have matching bullnose (rounded edge) pieces, use these where the tile meets the counter or ends at a wall. These pieces are usually cut using the same tile cutter or wet saw.
- Metal Trim: If you use metal edging strips (like Schluter profiles), you must install these before you start setting the main field tiles. The edge trim acts as your starting point or boundary guide.
Electrical Cutouts
Cutting holes for electrical boxes is tricky but necessary.
- Measure Twice: Measure the exact position of the box on the wall. Transfer these measurements to the back of the tile you plan to cut.
- Make the Cuts: Use a carbide-tipped hole saw attachment on a drill to cut the opening. Start drilling slowly. For square cutouts around an outlet, it is often safer to use a wet saw to cut the straight lines, leaving a small square in the center to be chipped out carefully with a cold chisel.
- Test Fit: Dry-fit the cut tile before applying adhesive to ensure it fits around the box perfectly. You need about 1/8 inch gap around the box for the switch plate cover to hide the edge.
Common Mistakes to Avoid
Even with a good guide, mistakes happen. Being aware of these pitfalls can save you time and material.
- Not Leveling: Assuming the counter is flat is a huge error. Always use the counter as a guide for your baseline, but verify it with a level.
- Using Too Much Adhesive: Thick adhesive squishes out between tiles, making spacers useless and forcing you to scrape constantly. It also takes much longer to dry.
- Letting Grout Dry on Tiles: If you see grout starting to harden on the tile face, clean it immediately. Dried grout haze is hard to remove later and might require chemical cleaners or aggressive scrubbing.
- Skipping Sealing: If you use porous stone or light-colored grout, skipping the sealer invites stains from tomato sauce or oil right into your beautiful new wall.
Frequently Asked Questions (FAQ) About Backsplash Replacement
Q: How long does the entire backsplash replacement process take?
A: For an average-sized kitchen (about 20 square feet), removal might take half a day. Surface prep takes a few hours. Laying tile, if done carefully, can take one full day. Grouting and cleaning take another half day. Allowing for drying time, expect the project to span 3 to 5 days total, including waiting periods.
Q: Can I tile over an existing backsplash?
A: You might be able to, but only under specific conditions. If the existing backsplash is flat, securely adhered, and not overly glossy (like glossy wallpaper or thin vinyl), you can sometimes use a specialized bonding adhesive. However, for the most durable, long-lasting job, removing old backsplash is always recommended. Adding thickness can also cause issues where the tile meets cabinets or window frames.
Q: What is the easiest type of tile for a beginner?
A: Standard 4×4 inch or 3×6 inch ceramic tiles are usually the easiest. They are light, easy to cut with a manual snap cutter, and the grout lines are wide enough to forgive minor alignment mistakes. Peel-and-stick options are simplest but offer the least durability.
Q: What should I use to cut porcelain tile?
A: Porcelain is very hard. You must use a wet saw with a continuous rim diamond blade specifically rated for porcelain. A manual cutter will likely chip or fail to cut through it cleanly.
Q: How far from the stove do I need to seal the backsplash?
A: It is best practice to seal the entire backsplash area, especially the grout, as heat and splatter are concentrated behind the cooktop. If you used materials that are naturally stain-resistant (like some glass tiles), you only need to focus on sealing the grout lines thoroughly.