
Kitchen burn first aid starts immediately after the injury occurs: kitchen burn first aid involves cooling the burn right away with cool, running water for at least 10 to 20 minutes, removing jewelry or tight clothing near the burn before swelling starts, and covering the burn loosely with a clean cloth.
Kitchen burns are common. They happen fast. Splashing oil, touching a hot pan, or leaning on a stove can cause them. Knowing what to do fast makes a big difference in how well the skin heals. This guide will help you treat burns at home and know when professional help is needed.
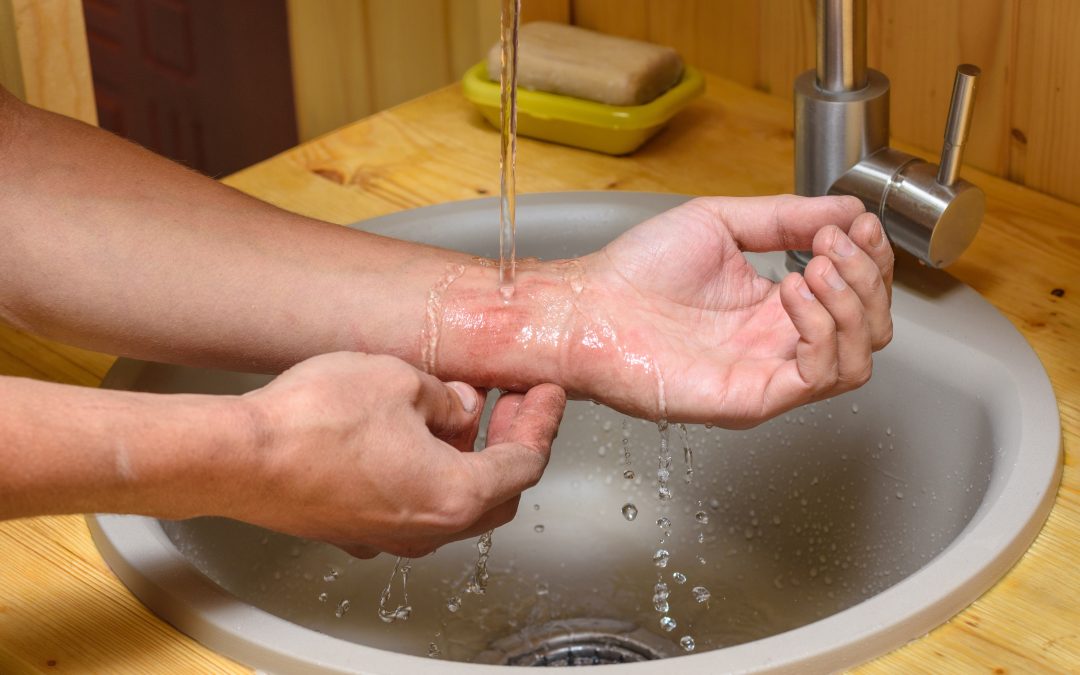
Image Source: www.afcurgentcare.com
Deciphering Kitchen Burn Severity
Not all burns are the same. Burns are grouped by how deep they go. This helps decide the best way to treat them. Doctors use three main grades: First, Second, and Third degree.
First-Degree Burns (Superficial)
These are the mildest burns. They only hurt the top layer of skin (the epidermis).
- Look: The skin turns red. It might swell a little.
- Feel: It hurts a lot when you touch it.
- Healing: Usually heals in about a week with no scars.
Second-Degree Burns (Partial Thickness)
These burns damage the top layer and the layer beneath it (the dermis).
- Look: The skin is very red, splotchy, or white. Blisters form.
- Feel: It is very painful.
- Healing: Can take two to three weeks to heal. Minor ones might not scar. Deeper ones often do.
Third-Degree Burns (Full Thickness)
These are the most serious burns. They destroy both skin layers and may harm fat, muscle, or bone underneath.
- Look: The skin can look white, leathery, brown, or charred black.
- Feel: Surprisingly, it might not hurt much because the nerve endings are destroyed.
- Healing: Needs urgent medical care. It will almost always leave a scar.
Immediate Steps: Swift Kitchen Burn First Aid
When you get a burn, every second counts. Quick action limits the depth of the injury. This section covers the critical first steps for treating minor burns in the kitchen.
Cooling the Burn: The Golden Rule
The very first thing to do is stop the burning process. Heat stays in the skin even after you move away from the source.
- Run Cool Water: Place the burned area under cool (not ice-cold) running tap water.
- Duration: Keep the burn under the water for 10 to 20 minutes. This draws heat out of the skin.
- Avoid Ice: Never use ice or ice water. Extreme cold can further damage the already sensitive tissue. This is a common mistake that makes things worse.
Removing Constrictions
Swelling starts fast after a burn. If you have rings, watches, or tight clothing near the burn, take them off right away.
- If jewelry sticks or is hard to remove, do not force it. Wait until swelling goes down or seek medical help.
- Cut away fabric stuck to the burn gently. Do not pull off anything stuck firmly to the skin.
Covering the Burn
After cooling, protect the area from air and dirt. Air can increase pain. Dirt can cause infection.
- Use a sterile, non-stick gauze pad.
- If you don’t have sterile gauze, use a clean, dry cloth, like a dish towel or bed sheet. Wrap it loosely.
Home Remedies for Kitchen Burns: What Works and What Doesn’t
Many traditional home remedies for kitchen burns exist. Some offer temporary relief. Others are dangerous. It is vital to use safe methods only.
Safe and Effective Soothing Methods
The goal here is soothing skin after a burn without causing more damage.
Aloe Vera Gel
Aloe vera is famous for good reason. It has cooling and anti-inflammatory properties.
- Use pure aloe vera gel directly from the leaf or a high-purity store-bought product.
- Apply a thin layer gently over the cooled burn. Reapply every few hours as needed for comfort.
Honey
Medical-grade honey has been used for centuries. It fights germs and keeps the wound moist, which helps healing.
- Clean the burn well first.
- Spread a thin layer of raw or medical honey over the burn.
- Cover it with a sterile dressing. Change this dressing daily.
Cool Compresses (After Initial Cooling)
After the initial 15-20 minutes under running water, you can use cool compresses.
- Soak a clean cloth in cool water, wring it out, and gently place it on the burn.
- Change the compress often to keep it cool.
Methods to Strictly AVOID
Some popular home remedies for kitchen burns can introduce bacteria or trap heat.
| Harmful Home Remedy | Why You Must Avoid It | Risk |
|---|---|---|
| Butter or Oil | Traps heat in the skin, making the burn deeper. | Increased tissue damage. |
| Toothpaste | Contains chemicals that irritate the burn and can cause infection. | Infection risk, skin irritation. |
| Egg Whites | Can carry bacteria like Salmonella, leading to severe infection. | Bacterial contamination. |
| Ice or Ice Water | Causes rapid cooling that can damage skin cells (frostbite). | Further skin injury. |
Medication and Best Ointments for Kitchen Burns
Once the initial cooling is done, using the right topical treatment can speed healing and manage pain. Knowing the best ointments for kitchen burns is key for aftercare.
Over-the-Counter Pain Relief
For pain management, common non-prescription pills work well for first and minor second-degree burns.
- Ibuprofen (Advil, Motrin) or Acetaminophen (Tylenol) can reduce pain and swelling. Follow dosage instructions carefully.
Topical Treatments
These creams and gels are designed to protect the wound.
- Antibiotic Ointments: For minor breaks in the skin, a thin layer of Neosporin or a similar triple antibiotic ointment helps in preventing infection kitchen burn sites.
- Silver Sulfadiazine (SSD): This is a prescription cream often used for deeper second-degree burns. It prevents bacterial growth effectively. Only use this if directed by a doctor.
- Petroleum Jelly (Vaseline): For simple, clean first-degree burns, keeping the area moist with plain petroleum jelly is often enough. It keeps air out and supports healing.
When applying any ointment, make sure the burn is clean and dry first. Use a thin layer.
Aftercare for Kitchen Burns: Promoting Fast Healing
Good aftercare for kitchen burns prevents scars and speeds up the recovery process. This applies mainly to first-degree and small second-degree burns.
Managing Blisters
Blisters are your body’s natural bandage for deeper burns.
- Do Not Pop Blisters: Popping a blister opens the wound to infection. The skin covering the blister protects the new skin underneath.
- If a Blister Breaks: If a blister breaks on its own, gently clean the area with mild soap and water. Apply an antibiotic ointment. Cover it with a non-stick dressing.
Keeping it Moist and Covered
Keep the burn covered lightly until it starts to heal well. Moisture is vital for healing without scarring.
- Change dressings daily, or sooner if they become wet or dirty.
- When the skin looks mostly healed (no more weeping or open areas), you can stop bandaging it. Then, continue using a good moisturizer or aloe to keep the new skin soft.
Protecting New Skin
New skin is very delicate and sensitive to the sun.
- Keep the healed area covered when outdoors for several months.
- If sun exposure is unavoidable, use a broad-spectrum sunscreen with an SPF of 30 or higher. Sun exposure can cause permanent darkening or lightening of the scar tissue.
Recognizing Severe Kitchen Burns and When to Seek Help
Knowing when to see a doctor for a burn is the most important part of burn care. Minor burns can be managed at home, but severe burns need urgent professional treatment.
Signs That You Need Immediate Medical Attention (ER Visit)
If you see any of these signs, call emergency services or go to the nearest emergency room right away:
- Size Matters: Any burn larger than the size of the palm of your hand.
- Location is Critical: Burns on the face, hands, feet, genitals, or over major joints (like the knee or elbow). Burns around these areas can limit movement if they scar poorly.
- Depth Indicators: Any burn that looks deep—charred, white, leathery, or numb (third-degree signs).
- Inhalation Injury: If the burn happened in a closed space and the person has trouble breathing, a hoarse voice, or soot around the nose or mouth. This suggests smoke inhalation.
- Chemical or Electrical Burns: Always seek help for burns from chemicals or electricity, even if they look minor on the surface. They can cause deep internal damage.
Signs of Infection in a Healing Burn
If you are managing a burn at home, watch closely for signs that it is getting infected. This is a key aspect of preventing infection kitchen burn sites.
| Sign of Infection | What It Means | Action Required |
|---|---|---|
| Increased Redness | The redness spreads beyond the original burn area. | See a doctor. |
| Pus or Cloudy Fluid | Oozing thick, yellow, or green fluid from the wound. | See a doctor immediately. |
| Foul Smell | A bad odor coming from the burn site. | See a doctor immediately. |
| Worsening Pain | Pain increases instead of decreasing after the first few days. | See a doctor. |
| Fever or Chills | Signs that the infection may be entering the bloodstream. | Seek emergency care. |
Types of Kitchen Burns Treatment: Matching Care to Cause
The source of the burn changes the initial steps slightly, affecting types of kitchen burns treatment.
Thermal Burns (Heat)
These are the most common, caused by steam, hot liquids (scalds), or hot surfaces.
- Treatment Focus: Rapid and prolonged cooling is essential to stop heat penetration. Follow the standard first aid protocol outlined above.
Chemical Burns
These happen from cleaning products like oven cleaner or drain openers. They continue to burn until neutralized or washed away completely.
- First Step: Remove all contaminated clothing immediately.
- Washing: Flush the area with large amounts of cool running water for at least 20 to 30 minutes. If the chemical is a dry powder, brush it off gently before rinsing with water.
- Seek Help: Always call a poison control center or go to the ER for chemical burns, as these can be severe even if they look small.
Electrical Burns
Often caused by faulty appliances or cords. These can look minor externally but cause severe damage inside the body.
- Safety First: Do not touch the person until you are sure they are safe from the electrical source. Turn off the power if possible.
- Assessment: Always seek immediate medical help for any suspected electrical burn. Internal tissue damage is the main concern.
Long-Term Healing and Scar Management
For second-degree burns that heal, the appearance of the scar is often the next concern. Good long-term care helps minimize this.
Massage and Moisturizing
Once the wound is fully closed, massaging the area can help break down tough scar tissue.
- Use a gentle, unscented lotion or a specialized scar cream (often containing silicone).
- Massage in circular motions for several minutes, several times a day. This keeps the scar tissue soft and flexible.
Pressure Therapy
For deep second-degree or third-degree burns, doctors may recommend custom pressure garments. These specialized clothes apply constant, even pressure to the healing area. This helps flatten scars and reduce redness over time.
When to Consult a Specialist
If a burn does not heal after four weeks, or if the resulting scar significantly limits movement, consult a plastic surgeon or a burn specialist. They offer advanced treatments like scar revision surgery or specialized laser treatments.
Frequently Asked Questions (FAQ) About Kitchen Burns
Q: Can I use ice cubes directly on a fresh kitchen burn?
A: No. You should never apply ice cubes directly to a burn. The extreme cold can cause frostbite on top of the burn, leading to further tissue damage. Use cool, running water instead.
Q: How long should I hold my hand under cool water?
A: Hold the burned area under cool (not cold) running water for at least 10 minutes, or up to 20 minutes for deeper burns. This is crucial for stopping the heat damage.
Q: Should I use antibiotic ointment on a blister?
A: No, not unless the blister has already popped open. If the blister is intact, keep it covered lightly and moist with petroleum jelly or aloe. If it breaks, clean it gently and then apply an antibiotic ointment to prevent infection.
Q: How can I tell if my burn is infected?
A: Signs of infection include increasing redness spreading from the burn edges, foul odor, thick yellow or green pus draining from the wound, and pain that gets worse after the first day. If you see these, see a doctor.
Q: Are natural oils like coconut oil good for kitchen burns?
A: While coconut oil is moisturizing, it is best to avoid it immediately after a burn. Applying any oil too soon can trap heat in the skin. Stick to cool water first, then consider pure aloe vera gel or petroleum jelly once the initial heat is gone.